Showing posts with label my projects. Show all posts

Thursday, June 24, 2010

Laminate is indestructible.

This project is a PERFECT example of the need for patience when working on projects in your home. This is something I have very little of when I get on a roll.

The new look in kitchens is two tones for wood cabinets -- for instance, cherry cabinets and a black island. Depending on the room and the wood tones, I think this can be beautiful. The other night, I was watching an HGTV show and they covered the back of an island with a ratan rug -- it gave it texture that was interesting.

Dangerous. I start looking at our kitchen...thinking of how everything kind of melts together...the cherry cabinets, cherry table and chairs (I'm working on that one), cherry floors and cherry island. I thought, how great would a black island look? I'll add molding to it (an obsession of mind, as you will soon see) and paint it black! Brilliant!

Well, I thought I had planned it out well. I knew the laminate they make the sides of the island out of would not hold paint well. So I got the sander out, got the right grit sandpaper, planned out my painting... So I sanded and painted. When I sanded the first coat, it rolled right off. Gah. So I sanded again. And again. And. Again. Gave up, got the liquid sandpaper. It seemed to work great -- I painted again. And I go to paint the final coat and paint was literally rolling off in my hands. I mean, really.

At this point, I am over this project in a big way. I painted it one more time and will just have to see how it holds up. If it doesn't...I'm calling in the professionals.

The moral of this story is...TAKE YOUR TIME. Do it right. And USE PRIMER!!!

Here is the before:
And here is the after:
The best part -- this was a $30 project:
  • $24 for the molding materials
  • $6 for liquid sandpaper
  • black paint was leftover from another project

Friday, May 8, 2009

Why I always, always, ALWAYS use primer.

Now I always, always, ALWAYS use primer. Back in the day (even a year ago) I sometimes skipped this step. (Check out my very first post on this blog...)
I sanded this island within an inch of it's life. I'm not kidding. Then I used liquid sander. You see what still happened when I started taking off the molding yesterday?:
Peeled. right. off. Oh well, I'm redoing the island anyway, and I'm almost done. I LOVE IT PEOPLE!!

I'm hoping to finish painting it tomorrow, but for now, it involved some of this...And some of this...

HELLOOOO LOVAH!!

Oh baby, my nail gun is going to be soooo jealous of you my sweet, sweet Lovely.

I hope to post the finished island this weekend. And yes, it is something you can do. And yes, it's easy. AND YES, it's cheap. (As long as you don't buy a $110 miter saw in the process.)

Monday, November 10, 2008

Somebody stop me.


Please.


My mind is positively swimming with projects I have done, I am planning on doing, and I WANT to do. Does this tell you anything???:


You know how you sometimes wonder, "Wow, how does Hobby Lobby stay in business with such great sales?" Uhh, that would be ME.


It's so bad lately, they know me by name when I walk in -- instead of "NORM!" -- it's, "SARAH!" And it's not just hello, like, "Hello-customer-like-everyone-else." It's hello like, "Well hello there, I-have-seen-you-15-times-this-week-and-it's-only-Monday."

I was thisclose to running to Lowes tonight to pick up supplies for another project...but I stopped myself. Because I already have ALL of these to finish up...

This I got at a garage sale for $15!! A-door-able! Can't decide what color I will paint this yet...


These...(Oh kitty, you look GORG!)


This is part of the inspiration for the Bub's big boy room: (clearance for $15, yahoo!)


My Uppercase Living order I still haven't done anything with:


Ohhh, Homegoods, you are TOO good to me -- $15 BABY!:


Five bucks for this one, and it will hold the Boy's books in his room:


I'm going to TRY to make this into a Christmas tree stand: (for $3!)


I got this today for $.99 at Goodwill -- I have grand plans for it. Three women were trying to grab it from me while I was in the store, and I was fighting the old biddies off -- BACK OFF WOMEN!! It's my Christmas topiary/branchy/greenery/berry thingy!!


My craft table. Egads. Help me.


This is one hidden on that table:


So is this one -- a buck!!


Ohhh, here's part of my goodies for my first giveaway! Yaaay!!


And I can't wait to show you what I do with this one! ;)


Could you all just please stop posting all these cute, cheap, quick, awesome projects that I want to copy that minute??? Puhleeeze? My husband is I am begging you!!


Monday, October 13, 2008

Weekend o' projects!

When the hubby is away, a Thrifty Decor Chick will play...and play I did with quite a few fun projects. When I say "fun," I know most of my friends would rather claw out their eyes than do these "fun" things, but it is heaven to me. :)

Let's see...first off, I started with the retreating of the bathroom window, which you may have seen...then I moved on to trying this whatchamacallit out with my own little spin:

I bought a huge pad of paper at Goodwill for $2.99. (First glance..."Ugh, who would want a big pad of paper like that?" Second glance, "OMG it's perfect!!") Used a hot glue gun and fabric I already had to cover the ugly binding and bought cheap drawer hardware that I painted to hang it. So caauute! I think I may paint the knobs apple green though, not sure. Our son LOVES it. The crayons are up high on a shelf though, thank you.


Onto the next project, another one in the Boy's room. My Dad and I built built-in bookshelves in his room when I was pregnant. I wanted to add a window seat between them but we never got to it. We tried doing it earlier this year but because I'm Anal Annie, we can't make it the way I want. So because I'm thrifty, I said forget it for now. This toy chest was from Target and I put the letters on there to spruce it up a while back:


So I decided to make it a mini-window seat. I got foam, cut it to the size of the lid:


Took the lid off, spray adhesived (adhesived? A word? Sure.) the foam and the lid and then started covering. I wrapped a thin piece of batting around it that I already had:


Another I-can't-live-without-it tool -- my staple gun! Then I took the fabric and wrapped that around too...

Here it is in all it's cuteness...and it's pretty comfy too!


While we're up here, let's admire the view. GORG!! (Taken from Kath and Kim, get used to that one!) We are so lucky to have this amazing land behind us. The Midwest is beautiful right now! OK, onto more! Yes, there's MORE!!


I have this light in our kitchen that I got for $30 at Lowes. (Yes, $30. Don't hate!) I like the shades but they needed a little somethin'.


So here they are with a little somethin' and some hot glue:


Love. It. The trim is the same trim I put on these, so it works perfectly!


You'd think after burning my fingers with the hot glue fifteen trillion times this weekend that would have been it. But noooooo...not for me! I did a couple other projects that I will show you later. And I'm trying to work some magic with this purchase from my b-day shopping:


Stay tuned Chickees and hope you had a great weekend!!

P.S. I can't thank you enough for all the comments -- I love them! I am trying really hard to comment back or e-mail you all. If I haven't gotten to you, I will! Thanks again!

Saturday, September 27, 2008

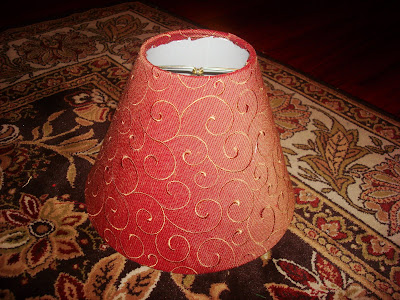
Lampshade tutorial.


I have a lampshade that has been bugging me for months -- I wanted to recover it but couldn't find the perfect fabric. Tonight, at ten minutes to closing, my Bub and I ran into Hobby Lobby (my second trip today, yikes!) and I found the PERFECT fabric! And trim! In less than ten minutes! Yayeeeee!


So I took pictures as I recovered this time just to prove how easy it is! Before:


You really don't need much fabric, just depends on the size of the shade. I lay mine out and trace it (using chalk) -- giving extra room so the fabric wraps around:


Use a hot glue gun to secure the fabric. You can cut little slits every couple inches so the fabric wraps easily:


Taadaa!! But it still needed something...


Trim! I found the perfect match:


If you've seen my family room, you'll understand how perfect the swirlys (swirlies?) are! I loved it so much, I did the little shade in the kitchen:

I'm so excited! My cat, however, is thoroughly unimpressed:

That looks says, "You add this crap to my food bowl and I will pee on your drapes, lady."

Sunday, September 7, 2008

$1.50

Ohhhh...how I can make $1.50 go on and on and on! I picked out a bronze glaze (that cost $1.50 for the bottle) for the hardware on the armoire I repainted a few weeks ago. I loved the way it looked so much, I ended up using all over the place! Here are some examples:

The hardware on the armoire was black, but I needed them to pop off the new black color:


I used stencils I already had, with the glaze, to decorate the armoire doors:


The is the artwork I made for over our master bedroom fireplace. I used the bronze glaze to highlight the texture:

I used another stencil with the glaze to add to the wainscoting in the powder room:

And used the glaze to repaint the textured parts on the powder room walls so they would pop. (I also used the glaze for the mirror!):

There are so many different options available -- tons of different metallic glazes and hundreds of colors at the craft store. I was going for the bronze look and this turned out to be just what I wanted. AND I still have some left. Believe me, I've tried to find more places to use it but I just need to put the bottle AWAY. :)

Sunday, August 31, 2008

Who doesn't love a good before and after picture?

I can't get enough of "before and after" pics -- if they made books or magazines with just pictures and pictures of every little detail before and after, I would be in heaven. (Kind of like the look and find books my son is obsessed with right now -- I'm all about the details.) I found some older pictures from our house the other day, and thought I would share some of my own transformations with you.

I'm always growing and expanding decor-wise. Especially working in the decorating field, I feel like I've gotten more creative over the past couple of years. Sometimes I look at old pictures and want to cringe...I hope I don't feel that way a few years from now! :)


One of my favorites is our corner fireplace in the family room. We both thought a corner fireplace would be great and put it there on purpose. And then I realized what a pain it was to work with. My solution was (SHOCK) molding!

BEFORE:


AFTER:


I'll share more of my own before and afters soon -- there are some doozies!! Yikes.

Sunday, August 10, 2008

Progress!

Sorry, I didn't post much last week, did I?? I will make up for it, I swear. I have made a ton of progress on our powder room and for the most part, now comes the easy stuff...

Here are the before pictures. I used to love the burgundy and tan walls, but the colors were getting old, and this room is where I first tried my hand at chair rail...I was a novice and it showed. I didn't know how to miter corners, so I used base board pieces on all the corners. It looked OK but now that I know how to do it for real, it had to be redone. :)


The mirror was way too big for this space, the light fixture was a very nice one but I didn't love it, and I had never placed the chair rail at the right height, so it didn't continue on the sink wall. One thing I did love about the room were the empty frames. They were always a topic of discussion when someone went in for the first time! I loved them! But I'm planning on using them in our bedroom now, so it's a good way to save money.

Here are the after pictures. I redid everything -- chair and crown molding, the light, paint, the ceiling and even the light switch covers!


I think it is completely different, which is what I needed! The only thing that bothers me, that I can't really get around, is that I couldn't put the chair rail high enough to clear the sink. The molding I tore done left damage to the walls, so I had to put the new chair rail up exactly where the old was. What you can't see here is that I have raised stencils I had put above the sink, so they help to distract from the molding not continuing across. I'm going to paint the stencils the same bronze color as the mirror and light fixture so they will pop a bit.

I still need to paint all the molding, but other than that, it's the fun stuff -- accessories! I need a new rug, and definitely something for the walls. Believe it or not, this room has perplexed me more than any when it comes to the walls. Even though it's tiny, there really is a ton of wall space and it's hard to get a nice balance between too much and too little. Thanks for looking, and I'll be back this week!!