Wednesday, April 29, 2009

God made iPhones for bloggers

I think I have died and gone to heaven.

Remember my taped together phone from my last post? So many of you were so sweet and harassed me, made fun of me made me feel so much better about my crappy phone.

You must know that I've been through about four phones in two years. I had a cute little pink one when our son was born. And it was soooo adorable when he would want to play with it and then eat it. It died. So did the others -- throwing, dropping, baby goo, whatever you can think of...they all died.

So the last time I said, I'm not buying another nice phone again until he's out of this stage. I've learned he'll never be "out of this stage" so I decided I wanted something NICE. Hence this glorious purchase:

Hubby has had one for years and I've never understood how he can lay in bed for an hour before sleeping, just messing around on this thing. Ummmmm YEAH.

Now I get it.

I am telling you people, it is freakin' amazing. AMAZING. I can get on the Internet from ANYWHERE. I can play just about any game I want. Look -- I got a free "app" that's a level:
I would have never known that our kitchen island isn't level if I didn't have this phone. What would I have done??? (And yes, just another example of how weird I am -- I'm a tool kind of girl and this about put me into a tizzy when I saw it.)

I'm still not sure what "apps" are -- just fun stuff you download I think. Like the faux lighters you see lit up at concerts. Freakin' adorable.

Look what I can do whenever I want:
Check your e-mails!! Look -- there are NONE in the inbox. I push.a.button and there they are. I've checked them ALL!! Oh good God, I'm not kidding, this is the best second best like, fifteenth best day of my LIFE.

So if I'm sitting in the doctor's office, I'll never be bored again.

Cause I have the iPhone. (Why didn't I have this when I was pregnant??)

I won't be bored at a stop light, because I'm so impatient I can't wait for 15 seconds.

Cause I have the iPhone.

I won't get bored drying my hair.

Cause I have the iPhone.

(You think I'm kidding.)

It even has a pretty decent camera on it: Giddy.

Now just like Crackbook, I'm sure this will wear off eventually. (Right?)

It does make me worry that we are creating a generation of kids who won't be able to just sit and not do anything. That part of this stuff freaks me out a bit. I have a love/hate relationship with technology.

But for now...I LOVE.


Monday, April 27, 2009

The easiest, cheapest, custom drapes EVER.

Have you ever lived with something in your house for years and YEARS, not in love with it, but liking it OK, just fine with it?

And then you change one little thing in the room and it sets you off on this roll that is very unbeneficial to the pocket book?

That's me.

I've been transforming our loft into the toy room and am trying to walk the very fine line between a cozy space for the adults and a total kid space.

I had drapes in the room that I bought for our previous place that were a faux silk (I think the fancy name is polyester) and were very shiny.
Like I said, for years, I thought they were just OK. Especially when it was just an extra room we only used once and a while. But then when I started making changes, they were too heavy and all wrong for the lighthearted space I was trying to create.

So I went looking and found exactly what I was looking for -- muslin! It's basically just a cotton, gauzy-type fabric. And whoooeee, it is CHEAP! I didn't even hem it -- I love the frayed edges:
I found fabric for the toppers long ago -- they are my favorite part:
This is SO EASY. I promise you can make these by yourself in less than 20 minutes. Just find a fabric you love, and get about a yard an a half of it (18 inches or so) for each treatment. (You can do whatever size you want, but I like to stick with this measurement.)
Use your hemming tape to hem up all the edges:
Then just hang it from the clips, like I showed you here, on top of the main drapery fabric:
Then, to make sure they stay put and look like they are sewn together, just use a pin on each side:
You won't even remember they are there, let alone anyone else noticing them!


The great thing about this project is you can use just about anything for the main part of the drape -- sheets, old window treatments -- any fabric. Then you can splurge on a loverly fabric for the topper (on sale, with a coupon of course).

The muslin was only $15 for five yards. And it was 108 inches wide, so I really didn't need that much. I could have easily gotten away with three yards (these are really long drapes) and spent less than $10 for both:
I usually add lining to my drapes, but I love the way these let the light in the room:
I'm almost done with little tweaks in the toy room, and will show you soon. (I know I keep saying that!)

P.S. Remember the phone I taped together, in a sad, sad effort to avoid spending money on a new one (so I could spend it on other things)?? Well, this is it tonight:

My sweet, loving, two-year-old threw it. Outside. On the concrete. See those two wires sticking out? Those were the only things holding it together. And when I made him pick it up and bring it to me, he decided to pull the two parts apart. SNAP!!

New phone. Tomorrow. Dang.

Friday, April 24, 2009

Little updates

ACK! I've been cleaning like a mad woman! I'm hosting a party just for the girls this weekend and am doing just what I swear I won't do every time we have a party.

Freaking out.

I mean, reeeeeally, my girlfriend's won't notice the dust bunnies in the corners.
Right?!

I've finished up a few projects over the past couple weeks I thought I would share with you this weekend. First, I got my tulips for this vase:
I love my birdies AnNicole! Now if the cat would just stop eating the flowers, that would be nice:

I recovered the ottoman from this post. Oh, hello loverly fabric:

THANK YOU Heldy for finding it for me!! I heart you! I have plans for the rest of the fabric I'll show you soon.

I found this mirror at Goodwill back before Christmas, and painted it months ago, but didn't know what to do with it. Tonight I grabbed some candles and made a mini-candlescape out of it for the table from my last post:

I love it!

I went ahead and got the white rugs for the bathroom, to match the curtain I showed you in this post. Ohhh, they are soooo soft and fluffy, heaven for our feet! I even put up a pretty towel for you all! But now all I can think of is that the towels don't match the white rugs and curtain.

Good. Lord.
And finally, I couldn't resist hanging another one of my new keys from another lamp. :)
Have a wonderful weekend! I hope your weather is going to be as beautiful as ours!

Tuesday, April 21, 2009

A lamp transformation

I have found the only bad thing about buying from consignment shops is the no return policy. (Consignment shops are different from thrift shops like Goodwill.) This is bad, bad news for me because I once and a while, I suffer from what you may call buyer's remorse. I call it, Oh-it's-gorg!-I-must-have-it-right-now-screw-the-price-it's-gorg!-who-cares-if-it-won't-work-I-love-it-remorse.

Hence this lamp purchase:

I know it's hard to see...I was so stinkin' excited to paint this thing, I didn't take a before picture. Here's the lamp shade, just to give you an idea:

When I saw the lamp at the consignment shop, I fell in love with the unique shape of it. It's kind of retro and was definitely looking it. It needed updated, so I spray painted the whole thing (it is ceramic and wood) black, found a drum shade for $9 and added some extra grosgrain ribbon from the bathroom project (below) to the top and bottom:

Yahoo, much better! I felt like it still needed something, and today I found big iron keys at the same consignment shop ($7 for five!) that I lurve. I tied one on with a ribbon and think I love it!:What do you think?

I found a $9 pillow for the garage sale chair and am going to shop the house for new accessories for the table:

Love it!

I loved the tassels on the old shade, so I took them off and added them to another lamp:

Perfect! The Nester would be proud!! :)
P.S. Did I mention I love it? Maybe not. I love it. (There, only 25 "loves" in one post.)

Sunday, April 19, 2009

U.G.L.Y.

It ain't got no alibi. Our shower is UGLY.

Yeah! Yeah! It's ugly!

The shower is the ONE item in our house I couldn't get our builders to budge on. The shower doors are CRAZY low. It's nuts! We both have to bend down to get out of the shower, or we'll bonk our heads. The builder swore up and down they couldn't get a taller shower door. Huh.

Anyhoo, until we completely tile the whole bathroom, including the shower, (which will be most likely in my dreams only), I had to figure out a solution to hide this nasty thing:

I know, I didn't even match the towels or hang them up nice for ya'll. Just keepin' it real. :)

For a while I considered making a shower curtain and couldn't decide if it would work well. Then, one day Shannon posted hers and it was exactly what I was thinking!! I knew I had to do it.

I used simple white terrycloth instead of decorative fabric, so I won't stress if it gets wet. I found some grosgrain ribbon that matched the room and used my hemming tape to make a large rectangle, just to add some detail:
A cheapy almond colored shower rod was transformed with oil rubbed bronze spray paint. I used drapery rings from Lowe's to hang the curtain:
It will be open 99 percent of the time -- I think the only time we'll close it is when we have company over. But I love it open and closed!

The only problem -- one thing leads to another and now I need white rugs. Argh!! Isn't that always the way?

I'm having another Linky party ladies -- show everyone your Goodwill/thrift store/garage sale transformations! Fun, eh? I'll link it up on Monday, May 4th, so you have plenty of time to find that perfect item and make it caaaute!

Also, if you've tried anything I've posted about, I'd love to see it! I love when you e-mail me and show me what you've done! I'm going to do a post and share all of your projects, so if you have something you want to share that I inspired you to do, please e-mail me!

Thursday, April 16, 2009

Garage sale season is here!

I know many of you are HUGE garage sale fans. I mean, you love garage sales like I love Goodwill. That's BIG people.

And it's spring, so it's about that time. I didn't get into garage sales until the past couple years. I've hosted one for many years, but really realized the joy of a great garage sale find last year.

My $15 chair in our bedroom is one of my favorites. I drove by this sale at least twice before I got out to really look at the chair, then drove by two more times to make sure it was still there. Went home to measure, and went back a third time, praying I would find it. Sad I know, but by then I had fallen in love with it!!:
Another favorite was this scrolly mirror for $10. I couldn't believe the price. It started out a silvery color and I painted it black:
But I think my all time best deal was this cutie in my son's bathroom. I got it for TWO bucks! I covered the front with fabric from a pillow case. I love it!:
Because I know many of you are garage sale freaks, and like me are planning to hit some sales this weekend, I'm excited to introduce you to the site Garagesalestracker.com.

This site is awesome! To find a sale, just put your city or zip code in and it will tell you any in your area. (You determine the mile radius.) I don't know why, but I find this SO much easier than looking through the paper.

You can even search by item to find sales selling what you are looking for. FAB!

If you are hosting a sale, you can list up to two months before the date (compare that to the newspaper!), add images of what you are selling and for a limited time, listing your sale is FREE. Oooeee, I love me some free!!

Go check out their site here. And if you live in Indiana and are having a sale this weekend, list that baby and I'll be stopping by. :)

Wednesday, April 15, 2009

A new room to decorate -- help me decide!

Stink Eye Sister, otherwise known as "Elizabeth," graduated college last year after only seven five and a half years of school. (I like to exaggerate that a bit.) She did an internship in Atlanta last summer and then came home to find "real" employment.

I offered for her to stay with us...but the deal was practically written in BLOOD...only THREE months. I put my foot down and made this clear from the start. She found a real job and we were all thrilled!

And boy, did I stick to my guns. It's only been four, seven, nine months since she moved in.

Ahem.

Sooo anyhoo...about a month ago, I told her she needed to find her own place pronto. Why?
To get out and be independent?

Noooooo.

To find a place so I could decorate it?

Nooooooo.

So I could have this room in our house to redo? Yes!:
I'm one sick puppy, I tell ya. I mean, I'm kind of lying. (Kind of.) I really did want her to get out and stop eating all my food become independent. But the added bonus of a new room to redo didn't hurt at all. Her room is the one above. It was my stepdaughter's room, back in the days when she'd actually come hang out with us, stay the night, spend quality time, bring her friends over, play games...wait...sorry, ummm...anyway, this is her room.

My stepdaughter picked out the colors and we did this project together -- I taped off the squares and she and her friends painted them all. It was so special. Sniff.

Anyway. I was waiting on Sister to get the heck out of my house move out, being oh-so-patient.

Twiddling thumbs.
Checking watch.
Tapping fingers.

And then one day, last week, she got a real, real job. Like, for reals. Where she makes good money and everything! But it's THREE HOURS AWAY.
Stink Eye, I did not mean to move three hours away!! I just meant get out of my dang house!

Well, she's leaving. I'm happy but not happy about it. I'll be glad to have my food back, but I will miss her terribly. So to help me through this time (I'm exaggerating just a teeny bit here) I am thinking of the glorious things I could do to this room! All involve molding!

At first I thought I'd go with the old standard around here and do wainscoting. But then I thought more beadboard like I did in the laundry room would be nice:
I have too much of both in this house though. I want to do something different! Something like this?:
This wall is FANTASTIC:I think I'm leaning toward this now:
(Credits: Unknown ((my idea binder!)) and Pottery Barn Kids)
Oh my, I lurve it!! I've already decided on the colors -- Linden by Eddie Bauer for the walls and ceiling, and white for the molding and furniture.

What do you think?

Stink Eye, I hope you know how much I love you, how proud I am of you, and how very much I will miss you.

Monday, April 13, 2009

Make a sofa table for under $20. (For real.)

First of all, I hope you all had a wonderful Easter! We had a great one -- lounged all day. Well, I did. Hubby did some work outside and I napped, blew bubbles with the Bub and ate all day. A wonderful day with all of us at home, which is my favorite kind of day.

As promised, I'm going to share how I made our sofa table in the living room I showed you here. Before I do that, I have to get on my soap box about getting your furniture away from the walls!!

I've done this where possible in our home and love how it makes spaces more cozy, more intimate. In our family room, it would have been easy to put all the furniture against the walls:

But instead, I moved them away and created the sitting area. Sometimes it can be a pain...I mean, I have to walk a whole extra five steps to get around the sofa. But it's worth it.

In our living room, I wanted to do something similar and tried a few layouts, but with only one wall in the whole room, I had to end up placing the sofa there. I told you how I wanted to add more height to the sofa...so I knew a sofa table would be the perfect solution.

Have you ever seen an eight foot long sofa table? Me either. I knew I had to make my own if I wanted one. So I did, for under $20. Here's what you do --

Measure the length of the sofa. Measure how tall you want the table to be.

Go to Lowe's, have a board cut to the length you need it. I chose one that was nine inches wide, but you could do whatever you want. Then get more of the same board cut to the height you need. Depending on how long you want it, you'll want enough for each end, and at least one support in the middle:

Get some "L" brackets like these:
They usually come four to a package for around $3. Then just use a drill and use the brackets to put the "legs" on the bottom of the table. You're done! Mine is a little wobbly, but when you push the sofa up to it, it secures it perfectly.

I needed a little more height on my table, but didn't want to make the table taller, because you would see the unfinishedness of it (word? OK.) sticking up over the back of the sofa. Instead, I got a few more pieces of wood and made a little pedestal. I painted everything in chocolate brown:

You don't have to leave it exposed...for a long time, I had fabric over the table. You could even stain it. There are unfinished edges all over the place on mine, but no one would ever notice.

I'm not lyin' when I tell you these projects are easy. Have Lowe's or Home Depot make all your cuts and all you need is a drill and the brackets. The whole table will take you less than 30 minutes to make. Swear. For reals!

Friday, April 10, 2009

Transforming a Goodwill coffee table

Remember this find from a few days ago? A steal for $24.99 at Goodwill!

Here she is, in all her glory! I removed the knob and replaced it with an extra I had from our kitchen:
When I sanded it down I was beyond thrilled to find out it is REAL wood. Not laminate or veneer. Real knots in the wood and everything:
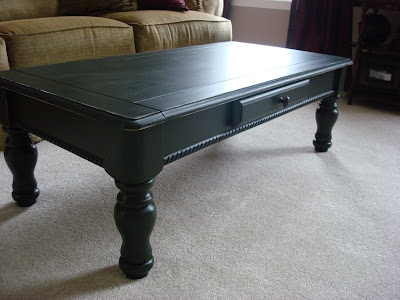
I didn't poly the table, because being real wood, any scratches or nicks will add to the character. I love the dents all over the top: I distressed the edges. Distressing stresses me OUT. Seriously. Spending that much time painting and then messing it all up?? Wow, it really messes with me. But it is worth it:


I felt like I was doing a photo shoot, I was taking so many pictures...YEAH BABY! YEAAAHHHHH...
I almost painted it chocolate brown, but there was too much of that going on in the room. I decided to pick up on some of the accessories and go with the black:
It pulls in the black from the chest on the sofa table, the lamp, and the kitty. Oh. Wait, not the kitty.

Just a refresher on painting furniture:
You don't have to sand, but it never hurts.
Primer is mandatory. MANDATORY. Unless you are painting bare wood.
Letting the primer cure (dry) for the recommended time is key. I cannot stress that enough.
You can get your primer tinted to the color of your paint (great with black or red).
I use a foam roller to paint all my furniture (angled brush for the detailed areas).
Letting each coat of paint dry for the recommended time is also important.
Sometimes I use poly over furniture but most of the time I don't. Poly leaves roller marks that drive me nutty! (Any suggestions for that?)
Let the furniture cure for up to a couple weeks (sometimes more, sometimes less) before you put anything on it, like accessories.

Have a great weekend! (OH, and I'll tell you the New Kid's story soon. Just so you know...Joey was SUPER sweet!)