I squealed with glee! (Really, I did. Out loud.) It didn't matter if it was $30, I was gonna get it. But it was only $10. Scha-wing!!
So this weekend, we welcomed Squishy to our family:
 He's a little shy. (He didn't realize a crazed bloggy woman was taking him home.) If you want to try this -- all you'll need for this project is the gumball machine, aquarium sealant and a cut piece of glass.
To start, take all the innards out of the gumball machine. This takes about ten seconds. Next, take the globe to a glass cutter to get a piece cut the size of the bottom. Mine was $3 and it took them five minutes:
 Take the sealant (from any pet store, less than $5) and put a thick, chunky bead of it around the edge of the circle of glass, on top. Place it onto the bottom of the globe. Don't push too hard, so that the sealant all squishes out. You want there to be some between the two pieces of glass:
 I was trying to make the bottom look at neat and clean, and they realized we'll never see the bottom with the marbles, so I just left it messy. I also took my (gloved) finger and spread it around the seam inside as well, to make sure the sealant was everywhere.
 This is the view from the side (the aqua-colored piece around the bottom is what I glued on):
 It has to dry for 48 hours, and then you can test it to make sure there are no leaks. After that, just fill with the fun stuff!
 I used two packets of blue and green glass for $1.99 each, an a plant for $4:
 I always wanted a fish for our son, and knew this was the only way to do it. With three cats in this house, fishy-fishy needs to be covered. Betta fish are different and can survive with less oxygen, and they tend to jump out of their homes (?!) so a cover is recommended.
 This weekend we watched Finding Nemo, and it had me feeling major mommy-fish guilt about keeping this guy in a bowl. (Sheesh.) But it's one of my favorite kiddo movies, and the Squishy part is freaking hilarious, so I shall call him Squishy:
 And over a gallon of water is better than the cup they have them in in the store, right? I saved him, he's not in captivity. :)
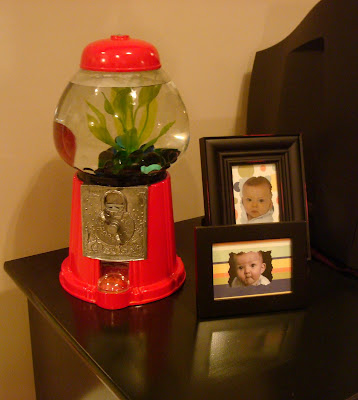 Adorable. The pictures just don't do this justice. And the machine is a pretty deep red, not blaring orange red like in these I-took-these-pictures-at-night-and-they-always-look-like-crap pictures.
 It has to dry for 48 hours, and then you can test it to make sure there are no leaks. After that, just fill with the fun stuff!
 I used two packets of blue and green glass for $1.99 each, an a plant for $4:
 I always wanted a fish for our son, and knew this was the only way to do it. With three cats in this house, fishy-fishy needs to be covered. Betta fish are different and can survive with less oxygen, and they tend to jump out of their homes (?!) so a cover is recommended.
 This weekend we watched Finding Nemo, and it had me feeling major mommy-fish guilt about keeping this guy in a bowl. (Sheesh.) But it's one of my favorite kiddo movies, and the Squishy part is freaking hilarious, so I shall call him Squishy:
 And over a gallon of water is better than the cup they have them in in the store, right? I saved him, he's not in captivity. :)Adorable. The pictures just don't do this justice. And the machine is a pretty deep red, not blaring orange red like in these I-took-these-pictures-at-night-and-they-always-look-like-crap pictures.
I am so excited for the winners of giveaway!! The winner of Beki's necklace is Beth Kohne and the winner of Bob's print is Molly from All about a girl and two boys. (Picked by Random.org.) Please e-mail me with your information and I'll get it to Beki and Bob!
P.S. Countdown to the NKOTB concert is ON BABY!!! WOOOeeee!!!
 I know I've been talking about this space for a while, and today I realized I hadn't shown it to you yet! The playroom is our loft, and used to be just an adult space for watching TV, but we rarely used it for a number of reasons -- I'm not sure what those reasons are, but I'm sure there are a number of them. :)


 The mirror was an extra -- I asked the builder not to install it in the powder room. They left it for us anyway and it was sitting in the mud room closet for five years. I hung it up just for fun:


 Basically 60 cents of paper, $1 wood tags and $1.50 knob from Hob Lob -- almost all half off!


 That space between the windows is the perfect spot for a window seat, but we may have to hire out for that. For now, the toy box works.
 One of my favorite parts of the whole room is the blue ceiling. I love how it makes the crown pop!:
 Oh yeah, and no Diaper Genie here -- I got cheap towards the end. We use a stainless steel trash can for diapers and it works great. The laundry bag is also from PBK and is perfect -- I just lug it downstairs, dump the clothes in the washer, then put the folded clothes back in to take upstairs.


