Showing posts with label beadboard. Show all posts

Thursday, June 24, 2010

More examples of my obsession

So now that I've explained how to add molding to your home, I thought I would share more ways I think it has transformed our house.

Our master bathroom is one of my favorite examples. We have extremely high ceilings that I painted with a mossy green color. After a while I realized how dark it was in there, but there was NO WAY I was repainting those walls again. I thought about adding tile around our tub, but figured it would be at least $1000 to do that. So I ended up using molding around the tub to lighten up the space.

Here is the before:

Photobucket


And here is it after, with the magic of molding! :)


Photobucket

Photobucket

I added rectangles to the walls around the tub with molding, a chair rail around the top and painted it all out white. Then I used beadboard around the marble base of the tub and painted it a shade darker than the walls.

The BEST PART! This whole project was $40! The molding is the only purchase I had to make -- the beadboard was leftover from another project and the paint I already had. You can't beat it! We'd still like to change out the tub fixtures, but that will be later -- for the plumber. :)

Wednesday, August 19, 2009

Rewind: Kitchen Island

I thought it would be fun to "rewind" every once and a while and show you some of my earlier posts and projects and then the updates I've made since.

If you've been with me for about five minutes, you've seen my kitchen island. But it's one of my favorite changes rehabs I've done in our home and is also one of the cheapest and easiest.

It started way back when, when all five of my friends read my blog. I mean, I have more than five friends, there were only about five reading this blog back then.

I swear -- I have more than five friends. For real.

My very first post was about how our kitchen was turning into a sea of cherry wood -- floors, cabinets, island, table and chairs:
I really love islands that look like furniture, so I thought I would change it up and decided to add molding:
I added faux panels to the sides and back and painted the whole thing out in black. This began my deep-seeded hatred of laminate. Laminate and I are not bffs. I actually had thought of doing beadboard, but I think it was impatience that got the best of me at the time.

After the redo, all the sudden the chairs had to go (isn't that always the way?). So I went to Garden Ridge and found new chairs for the table and island for a steal -- buy one get one get one half off:
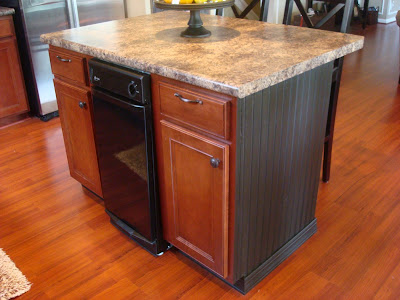
(The flash makes the island look grey in these pics.) As you know, I love me some beadboard, and I got an itch a few months ago to redo my redo with it:
Sigh. You just can't go wrong with beadboard -- really. Reheheally. The addition of corbels finished off the furniture-look I was going for:

And then cut down the chair legs by two inches with my compound miter saw (they were too tall) and upholstered my chairs to add a pop of color and cush for the tush:I lurve my beadboard island! I know many you have already redone your island or are planning on trying it -- you will love it!

Thanks for joining me on this island trip down memory lane. :)

Monday, May 11, 2009

A beadboard kitchen island.

Well, I hope this lives up to the drama I've created around this thing. I do adore how it turned out, and I hope you do too.
Oh my goodness, I luuuurve it.
I added corbels to under the counters and love how it turned out. I bought scrolly fancy ones a while back just for this project, but they were too much. I love these simple corbels, they look like they are meant to be there:
I used casing (made to trim out windows) around the bottom instead of baseboard or quarter round. I loved how chunky they were and the beaded detail around the top:Here's a few more tips I have discovered. When it comes to outside corners, I use dowel rods to fill in the corners. You can get them in just about any size you need. The skinny dowels, when painted the same as the wood, look just like the bead that runs down the beadboard. It works every time. You can't even tell where they are:
Hands down, the hardest part of installing beadboard is painting it. Obviously, there are ton of grooves you need to get filled in. I always paint a small section with a sponge roller first, then immediately use a small sponge brush to fill in the grooves. When you use the roller, the paint will get into the grooves and puddle up, and you have to get in there with a smaller brush to get that paint smoothed out.
I realized today spray paint may work well to do at least the first coat. It would take very light sprays but I think it could work. The island took one coat of tinted primer and two coats of black. My right hand looks like a claw right now. :)

I will poly over this whole project, but I'm going to wait a bit, which brings me to another tip. Beadboard is like flooring, in that it needs to acclimate to your home. It will expand and contract if you install too soon. (I did it too fast in the laundry room and now it needs to be repainted.) To prevent this, it's ideal to leave it flat, in the space you are installing it, for a couple days. I was good about that this time -- I left it standing up. In the garage. For a day. So obviously, I'm going to wait a week or so to poly just in case touch ups are needed. :)

One more tip -- don't be scared to take off the molding before you start (like I mentioned in my last post). If you have to tear up the wall a bit to get it off, don't worry. The fantastic thing about beadboard is it covers all sins.

Here's a before of the island:
Here's it is after it's first makeover, with paint and molding:
Here it is today. It's never changing again people:
Next project, upholstering the chairs...can't wait!!

Here's my dirty little secret though -- I've never painted the cabinets on the island. I was way too sceered to do it before, but now I think I'm ready. I think the whole thing in black will look fab:

For now, my hand needs a major break. Thanks for your patience! I hope you are inspired.

Sunday, May 10, 2009

How to install beadboard.

Happy Mother's Day! (Late.) I had a wonderful day with my two men (the little one and the big one), and then while Hubby had to do a high school musical (not the high school musical), my girl friend and I took her Mom and our four boys for a picnic, some playing at the park and a fun hike.

My little family ended the day with a Kentucky Fried Chicken dinner -- it's what I wanted and Momma gets what she wants. (At least today I do.) I hope all of you who are Mommy's had a wonderful day, and I hope all of you that are waiting to be a Momma had a wonderful day as well. :)

Anyhoo, you have probably guessed by now that the island redo involves beadboard. I just had to cover the laminate -- since I didn't use the primer and the paint was coming off in most spots, I was really over it. So I just decided to cover the whole freakin' thing. And I LOVE IT.

So I wanted to show you how to install this luscious stuff. First of all -- if there is any trim on the island, or on the wall you are working with, you'll need one of these thingamagigs. The name of them has completely escaped me. Soooooo tired people:
You'll want to use a rubber mallet with it, and this will probably be the most fun you'll have on the whole project. Don't be afraid ladies! Smack that baby! Tear it up!!

If you are installing beadboard on a wall, I recommend you remove the baseboards first. You don't have to by any means. It will just look more custom when you reinstall the baseboards over the beadboard. On the island, I removed the corner molding and the quarter round.

If there are any nails from the molding stuck in the wall/island, just use a wrench to pry them out:
Next up, measure the height you need and cut away. In my laundry room, I did it fairly high, around five feet. In our son's bathroom, I did it at about 33 inches. The latter is pretty standard. Basically, any height goes!:

You'll need a good glue, like liquid nails. Put a bead of it along the back of the board:

I recommend nailing them in as well, but you don't have to. It helps to keep the boards secure while you are working and keeps them from moving around while the glue dries. I use a nail gun, but you can just use a hammer and nails. I nail the bottom and top of each board.

Use a level and check it. The first piece is most important. And beadboard is sooooo forgiving...if subsequent pieces aren't perfect, you can make them level even if there is some space between them. After it's painted you won't even notice little imperfections:
I find this next step very important -- before you nail each piece, check the next one to make sure they will slip together OK. Then, you'll want to pull the edge of the piece you just glued on up a bit on the side that slides together. Then slide your next piece on, and nail in the previous piece. Does that make sense? If you nail one beadboard piece down, it can be really hard to get the next one in, just because it's so close to the wall:
Basically, you just want to keep some "give" when you put up the next piece.

I should mention here that you can also purchase large sheets of "faux" beadboard and have it cut or cut it the size you need. It's just a large panel, so the installation is much easier -- glue the panel up and nail in a few spots to secure it. I just love the look of real beadboard and I think it's fun to install. The pieces lock together kind of like flooring.

Take your mallet and tap each piece into the next one, checking level as you go (or at least every few pieces):
If you have to work around an outlet, you'll have to use your hand saw to cut shape out that you need. To get the vertical cut, (like to the right of the outlet here), I used a blade and scored it well, then just popped it off with a wrench. Especially if you are painting it black, you will never see any little imperfections:
Like I said, beadboard is very forgiving. I know, fo sho.

That's basically it. Bead board is EXTREMELY easy to install. The hard part is getting the pieces cut. Here's a few tips:

1. If you have an electric saw, this helps immensely. I did most of the island with my miter box and hand saw before my hand was about to fall. off. With the miter saw it was like I had died and gone to heaven. (I cannot believe I haven't bought one till now.) If you have a compound miter saw, make all your cuts beforehand, and installation will be a breeze.

2. If you don't have a saw, the home improvement store may cut them for you. Their blades are pretty heavy duty and beadboard is not. So they may or may not do it - ask them first. If you don't want to cut them by hand with a miter box, you'll have to find someone who has a saw to help you out.

3. You'll have some spots that will need skinny pieces of molding -- like when you get to the end of a wall. Again, the home improvement store may not cut this for you. Helps to have a friend for this part as well. Good thing is, you will need very few of these cuts done. And again, they don't have to be perfect. Caulk is your BFF.

I will show you the final pics of the island tomorrow. Stop yelling at me! I know!! I took some tonight and they look like crappola, so you'll have to be a little more patient so I can take them in the light.

Tomorrow I'll share how to deal with corners and how to paint beadboard. Have a wonderful Monday!

P.S. I said "piece" about 76 times in this post.

Thursday, October 23, 2008

Spray paint finger.


Does anyone have a cure for the pain of spray painting? I have spray painted SO MANY THINGS over the past five days, I've lost count. I even had to sleep with a heating pad wrapped around my arm one night. Not kidding.

So I was trying not to spend any money last weekend, (STOP laughing, I'm for real!), so I figured I'd do a few things in our laundry/mud room. A few things turned into about 25, but I'm so pleased with how it turned out. About a year ago, I had added the black beadboard to the room. I loved the black and yellow combo, so I kept going with that. This is some of the before:


I took the wire shelving down, bought a piece of MDF (for less than $5) and had it cut to size. I painted it black, and used iron shelf brackets (that I already had -- the were cream, now they're black) to put the shelf up:


I found two more canvas storage cubes a few weeks ago on sale at Target, and put all the odds and ends in those. I found a black and white ribbon that I loved, but the white was a little too stark. I actually soaked it in tea and yellow food coloring and it did the trick! Here they are all dressed up!: (By the way, the little white trash can is for the lint from the dryer. I don't know what I'd do without it there!)


The art is another poster from Hobby Lobby that was only $5! I cut them up and framed them:


I'm going to change this one out with the larger frames like up above once I get another mat made. I love the look of lamps in the laundry room, but for more than FOUR years, I've thought didn't have enough outlets. Duh, once I looked, I had plenty to work with. I got the lamp at Goodwill for $6! (It had a price tag of $49 on the bottom, NOT kidding!!) I covered the shade with $1 fabric. I also got the tray for a buck. Spray painted that too. Poor finger! I got the little ceramic container for $3 at a consignment shop, spray painted that! Poor, poor finger!!:


I LOVE how it looks with just the lamp on! So cozy!

I like having a towel near the washer, so I found a little $1 tray thingy at Goodwill, spray painted it, (shocking!) added fabric to the middle, and a cute knob at the bottom:


My favorite part of the redo was another consignment find -- the area next to the door was so bare, and I couldn't decide what I wanted there. I thought, maybe a clock, maybe a chalkboard...and at the consignment shop today...I found THIS!! It's BOTH!! And it was only $9!!!


Whooty who!! Can you even believe how perfect it is?? I will probably add some magnetic paint that I already have to it soon, and then another chalkboard layer. Loooove it!

Here are a few other views of the room -- my Ballard Designs rug that is just perfect and was less than $40 (I got this awhile back):

I got the idea for the table for between the washer and dryer from Shannon -- all it took was wood I already had, cut to size for the top and bottom, 1 x 2 wood cut to size for the legs, and brackets to hold it together. Then I painted the top and added the fabric to the front. I can use it for storage underneath!:


I added the new hardware the folding doors a long time ago. They were brass before (ew!) but now I love them:


The bench was from Overstock.com a couple years ago. The baskets hide the shoes perfectly:

I found little clothespins at Hobby Lobby, and yes, painted them black:

The vinyl lettering is from Uppercase Living. It makes the whole room:


The Southern Living hooks keep everything out of the way, and the little organizer by the door makes it so I HAVE to open and sort the mail as soon as I get in the door. Hate but love that thing!!


Soon I want to continue the black beadboard behind the washer and dryer (I was way too lazy to do it before) and add chunky black crown molding:


I will be sure to show you all when I do it! Here are some of the goodies before -- the topiary thing is the black towel holder now! And check out that tray! Sheesh!:


Oh, and I'm NOT spray painting another thing for a MONTH!! OK, maybe a week!! OK, really, probably tomorrow.