Showing posts with label popular. Show all posts

Tuesday, June 29, 2010

Kitchen redo: Week three!

035
HELLO! So are you tired of hearing about the kitchen redo yet? Yes? Too bad. I’m back for more. :)
Thanks to American Express, I am redoing our kitchen using Membership Reward Points – and this week they asked me to use the remainder of the points – 150,000! If you have an Amex and you use the points to shop, you know that’s A LOT of  points.
Still pinching myself. :)
I told you in my last post how I took my first trip to IKEA to get a butcher block countertop that will replace our island counter. I love the look of butcher block and love the idea of changing up the counters just a tad – the different textures and tones will look great! (Um, I HOPE.)
This part of our redo is out of pocket, so I was obviously trying to keep the cost down, and a 73 by 40 inch board from IKEA was $195:
block
I’ll have to get it cut to size to fit the island, but I couldn’t resist that price! It’s oak (the darkest wood they had), and I’ll be sanding it down a bit and staining it an even darker tone. Not sure what the tone will be, but it will be dark and rich and luscious! :)
While I was at IKEA (twice!), I found a few more items for the kitchen that were must haves.
The little spice jars and racks were too cute to pass up:

I see some apple green in it’s future. :) Still not sure where they are going though. (By the way, I think I got four of those jars for $3 I think? I have spent almost $2 for ONE at Hobby Lobby!)
Because I took down our pot rack above the island (it made the room feel twice as big!!), I was on the lookout for cookware storage:
   
LOVE these!!! I have a little rig up my sleeve for the one on the right to make it even easier to access. I’ll let you know how it goes. :)
This strainer was a lot for IKEA -- $25 – but I loved it!:

Another example of unbelievably inexpensive (I want to say cheap, but that just sounds cheap. But…it’s cheap.) this stuff is – I able lost it when I saw the woven chargers for only $5 each!:
035
I think the cheapest I’ve seen these is $15 each. Score! Because so many of you told me to check out the “as is” section at IKEA, we strolled in before we checked out and found the green plates and bowls (that I had almost just bought on the floor!) for a buck each! They are in perfect condition, so I have no idea why they were as is? I’ve washed them already and so far so good!
I knew I wanted to bring the white/cream and yellow I’m using in the kitchen onto the table, so I looked online at a place I’ve never ever bought one item – Williams Sonoma.
It’s usually WAY over my head price-wise. But because I could use points, when I saw those lemon napkins above, I was HOOKED. They are adorable! And the price really wasn’t as bad as I thought it would be – $7 a napkin. Usually I spend about that much on four, but it really wasn’t bad.  :)
So I used some points to print out a WS gift certificate, and there I was buying those napkins, and some perfectly perfect matching wash cloths:
044
I have to tell you it feels incredibly weird to shop at places like Williams Sonoma. Like, “I have money to shop here” kind of places. When I soooo do not have money to shop there.  :)
It’s been a bit surreal. And VERY fun. This is a once in a lifetime kind of opportunity and I’m thoroughly enjoying it. :)
I’ve gone to Pottery Barn for a few accessories as well, and guess what I see online after I get home from buying my cutie little lemon napkins?:

Argh! Those are too cute too!
The white salad plates in the place settings above are from Pottery Barn, and I found these awesome napkin rings there as well:
036
But I think they’re too much with the chargers so they’re going back. :) They were only $4.50 each, not too shabby! Aren’t they so fun? I bet they would be easy to make – just braid some thick jute rope together!
I showed you the new light from Home Depot here. I got the round rug from Target ($80 I think?) last year:

And have loved it there. For those who have asked, I LOVE having a rug under the table!! I swear clean up is so much easier than the hard floors. My trick is to let food dry a bit and then vacuum it up – no cleaning of the rug (usually) required!
Anyhoo, because the kitchen will have a new color scheme, the rug just won’t work anymore. And it’s not the best quality. It has a kind of haze of fuzz on the top that just doesn’t go away. You don’t notice it at all far away, but it bugs me up close.
Enter a round Pottery Barn rug:
round
It’s an outdoor rug made to look like jute. I love jute but it’s usually super thick and I knew that would be an issue with our kitchen chairs. I want the chairs to easily be pulled in and out from the table, so this was a perfect option!
I hope. We’ll see when it gets here.  ;) Hopefully it will make our kitchen look something like this:
outdoor rug
Complete with a pool. ;)
By the way, Stink Eye Sister, you owe me BIG for all this awesome stuff I’m passing your way for your new house. BIG TIME.
It has been SO EASY to use these Membership Reward Points from Amex! At first I was thinking I would have to wait weeks to get started on anything, waiting for gift cards to be mailed to us.
But I was giddy when I realized they have many options for egift cards:
   hdgc pbne1l 
You just order them and an email is sent within about 20 minutes or so. All I have to do is print them out and go! It’s been fantastic!! If you’ve done any size renovation in your house, you know it’s hard to plan when you’ll need to make one more trip to Home Depot. :) This has been great because I’ve been able to print them as I need them – awesome!!
Speaking of Home Depot, did you know they are affiliated with Home Decorators? I had no idea! When I realized that, I picked out this cutie console table for behind the sofa:
sofa table
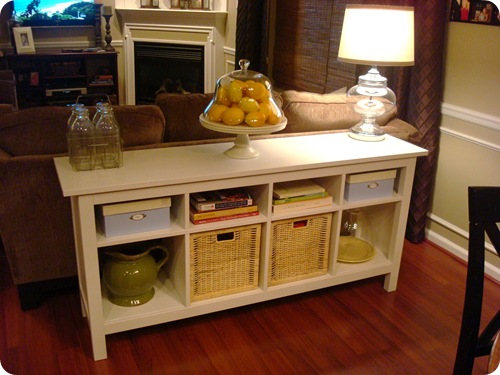
But when I went to buy it, I found out you can only use the Home Depot credit card – not a gift card. It was then (at midnight) that I realized I must go back to IKEA to get this one instead:
042
And I’m SO glad I did!!
I made a change to the Bub’s chalkboard this week and absolutely positively LOVE it:
051
I used to have it framed out with thin molding I had stained dark, but when I saw Katie’s chunky green frame around her chalkboard, I was in luuurve! So I beefed it up and it is AWESOME.
Cause I like em big. And chunky. (Sorry. I will use that movie quote every time the word chunky is ever used. You’ve been warned.)
I got a new fabric for the window treatments at Joann’s last week that I have fallen in LOVE with:

Ack! It’s gorg! I still have to decide on the type of treatments I’m going to do. I can’t decide between my no sew roman shades:
019
Or something a bit simpler like cornice, maybe with just a hint of curve to it?:
I can’t decide! I got a bamboo roman shade for the window above the sink at Home Depot today, so I’ll have to get that up before I decide. Hmmm…
So I need your help once more! I’ve been keeping a dirty little secret from you. I painted my beadboard kitchen island. Well, not the whole thing. Just one side. To decide if I like it.
And I do. :) (I did this about three months ago – it’s been sitting like that all this time.) It is going to be a cream color – a bit darker than the new backsplash I think.
My original plan was to paint the island and the base of the kitchen table cream, then stain the tops (butcher block and the kitchen table top) both the same tone:
pot rack
THIS look is exactly what I had in mind for the island:

But I’m wondering if that’s too much cream and brown, cream and brown. I LOVE at least one black piece in a room to “ground” it. I still really want to do the island in cream, so I’m wondering if I should perhaps paint the base of the table black, then stain the tops the same?
I’ve been worried that a cream base on the table is asking for hives – I can’t even imagine all the scuffs from shoes, etc.
What do you think? Black on the table base? Since the rug will be lighter, I think it will pop off of that and look great.
Or do I match the island and the table and do cream on both bases? Decisions decisions!!
What do you think Oh Brilliant Ones? Please share!! And thanks again in advance!

TDC is one of five blogs picked to promote the Amex Membership Rewards program.
I have received reward points to use as I wish to redo a room in our home.


Thank you to this week’s sponsor!:

rustedcapture125

My craft “room”

 029Well, it’s not really a room. There’s no real flooring, and zero drywall…but it works and I lurve it! I created this “space” a couple years ago, but recently have been making changes to make it function better and look cuter– as cute as cement walls and floors can get. ;)
The space started out like this a few years ago:

That would be a dumping zone. This is the first space as you walk down our basement steps, and because of that – everything just landed here. Well, most everything. It’s a big basement. :) Once this space was full, I would keep moving the piles around.
Last year, I added a folding table and shelving to hold wrapping and craft supplies and tools:
DSC00628A few weeks ago, when I started the massive decrapification of the basement (AGAIN), I made a few adjustments – I have learned the way I had things placed down here contributes to the crapifying of the space every year.
The first change was to move a shelf that had most of my decor items from the back of the basement to this area – I found having in the back corner of the basement made it rare that I would actually walk back there and put the stuff away.
So I moved it to this area. Then I realized how much decor STUFF I actually had, and ended up buying another new shelf to hold more. I did a lot of thinking about where I wanted everything else as well, and moved it all around to function better.
Once I had everything in the right spot, this is what I was left with:
046
Schnikeys. Ummm…this was better than the before before! WAY. Even though I had put the table and shelves in this area a couple years ago, it didn’t prevent it from becoming a dump zone. The table actually encouraged it really.
But, after some rearranging, a whole lotta decluttering, and some fun additions, this is what it looks like today:
034
Ack!! Isn’t it precious? Yes, I know, as precious as cement can get?!
After I moved the shelves around, I thought hard about where I wanted to put everything on them. I realized a while back that the reason the table became such a pit was because the shelf with my tools was on the back wall – and that’s the one I use the most.
So when I was done with a project – done mentally and physically mind you – the last thing I wanted to do is put all the tools away! It was so much easier to throw them on the table. Because of this, I moved all of my tools to the first shelf as you walk down the stairs:
043
Brilliant. It’s the simple things folks. Do you know how many cans of spray paint were usually thrown on the “craft” table? Because I didn’t walk the extra ten feet? I know, it’s only ten feet. But mentally, when you’re pooped -- it’s miles.
The two shelves of extra decor are next. It will make such a difference having these so accessible! I used to trek around to a dark corner of the basement to put this stuff away, so it eventually, it just ended up in piles. I’m a piler, yes I am. 042
I didn’t really need two sets of shelves, but I was determined to sort the decor stuff and make it easy to find everything. I purged and still have this much left! A lot of this used to be in bins – things like candles, frames, to-do projects. Having it all out in the open is SO much better!
I moved the shelves with the wrapping and craft supplies to the back wall. My goal is to USE the table to wrap or craft – so now they are right there where I need them!:
039035
Last year I came up with a way to store my wrapping paper, and it’s worked out GREAT! I drilled holes into the shelving and hung the paper rolls with twine:
041
Wrapping paper drives me nutty – all the unraveling, rolling, bouncing around. Argh! This has worked awesome! I love that they are out of the way and still allow for items on the shelf.
When I want to wrap something, I just hold it up, determine how much I need, then cut the paper. If the item is too large to hold up, it usually just goes in a bag.  :)
Once I felt like everything was in it’s place on the shelves, I moved on to the fun stuff. Whoohoo!
I decided a long time ago this spot would be as girly as it wants to be. I’m the only one who uses it, and even though I’m not what you would call a typical girly girl, I really wanted a space to just have fun with! Fun colors, fun prints, fun textures. This was the perfect spot!
The table is a simple folding table – and it is U.G.L.Y. on top. Last year I got some striped fabric and put it over the top with hot glue. This year, I wanted to amp up the fun and color a bit, so I went with this fabric instead:
031
Shut the front door…adorable. Aren’t the colors FUN? As you can see, I added the “skirt” with hot glue as well, so you can’t see these:
055
One is a bin I keep gifts in, one is a tool box for extra crap junk stuff.
The table cover fabric is from Hob Lob and was $6 a yard, 30 percent off. I only needed two yards. The fabric holds up surprisingly well! If I spray something like spray adhesive, or am painting, I just cover the table with scrap paper. (Usually the stuff they wrap my purchases with at Hob Lob!)
I literally hot glued it under the edges of the table. The skirt is leftover drapery lining and I glued that on too:
054
I wanted a cutting board for this table foreva, and decided to treat myself to one when I was done decluttering this space. It was $23 at Joann’s, 40 percent off:
020
Now I can craft, glue, cut, whatever, and not worry about the table. And it’s bright and happy! See the little green flower shaped thingy? It’s a silicon pot holder from Pier 1 – I got it for our kitchen, but realized today it would be the perfect little spot to rest my glue gun.
I tried it and by golly, it works!! (Yep, I sure did just say “by golly.”) The hot glue literally wipes right off of it. How stinking cute is that?
All the sudden I was finding the most adorable little accessories that worked with the colors:
019
The little clips ($1) and pencils ($2) were from Michaels – the pencils MATCH. Dying!!
Check out the eraser ($1):
008
I. am. dying.
Then I found this little pin cushion at Joann’s and couldn’t resist it:017
Hmmm…maybe I am a girly girl?  ;)
The organization of this space was HUGE part of this project. The color and little extras were fun to add. But the biggest change in this area was the lighting. As you can see from the first couple pictures above, there was just a single light fixture for the whole “room.”
Because my hubby often works down here during the summer (more on that spot later), we decided to add more outlets in the basement. Since the electrician was going to be here anyway, I asked him to add another light fixture in my craft area, and then a third light so I could swag a little fixture over the table.
I found a little brass beauty at the local ReStore last summer – it was spray painted and waiting in our garage all this time:
046
Let there be light!! It makes SUCH a difference to this area! It’s so bright and fun and now I can see what I’m doing when I work. Whoohoo!
I bought a glass lamp from Goodwill last summer as well. I took it apart and spray painted just the brassy parts with the same fun green:
037The $4 lamp shade was dressed up with a strip of extra fabric and some hot glue.
Can I get a “CAAUUUUUTE?!” Say it with me Squeezies!
My husband walked downstairs tonight and when he got down there, yelled up the stairs to me -- “Honey! It looks so cute down here! I love it!”
And that is why I love him. :)
The before shot that was really the half way shot, that’s how bad it was:
046 And my girly, bright after:
034
So worth all that work. I’ve got a few spring project I’ll be working on down here this week –- if they work out I’ll show you soon. Heck, I’ll show you even if they don’t.  ;)

Thank you to my sponsor:

Sunday, June 27, 2010

Decrapification: The office

 087 Every year around this time I start tackling the clutter CRAP in our house. It takes a few weeks for me to get into it. I need to get my mind switched off from the holidays and it takes a while for the piles of crap to reeeeally start getting to me. OK, they always get to me, it’s just whether or not my get-off-yer-booty kicks in and I finally decide to address them.
As much as the basement is giving me the heebies right now, I am making myself hold off on that space till the rest of the house is decluttered. There are constant piles by the basement steps for a few months as I go through each room. Then, when it’s all done, I let myself go after the pit down there. I’m so psyched to get that space even more livable for us this year, I’m trying to get through the rest of the house even quicker!
Last night, the office was calling my name. It is now the one and only room that is completely decluttered and clean and I lurve it! I started by going through every bin in the room. Up till yesterday, I had a bunch of little cigar boxes holding random junk, plus at least four other baskets and bins. As I started sorting through all of the holders-o-crap, I realized it had been ummm….never since I had used most of it. Did I really need three staplers? Five letter openers? Forty-five pencils?
Three glue sticks?
075
When I have used a glue stick…uhhhh…NEVER? Well, not since third grade.
Glad I bought tape for Christmas wrapping. Already had FIVE in the office:
 079
Yesterday morning, I was at the store and bought more correcting tape. Last night, I realized I had four more already sitting at the bottom of a bin:
 080
Can you puuuuhleeze say it with me? WASTE. OF. MONEY. Oh, and I’m sure I’ll use up the thousands of staples sometime before the year 2020:  072
Or the 34 notepads:
 069
Ahem. Seriously. I am a declutterer and this is what I had sitting in there. Gah.
I got rid of most of the bins and baskets on the desk. It feels fantastic!:033
I asked myself what I really need within reach at the desk. Writing utensils and something to write on and that’s it! Done. 
For storage, I kept a basket, and took some photo boxes I had and those now comfortably hold everything else I need – tape, label maker (swoon!), electronics, etc:
051
I have ROOM on the shelves! :)
I have a major issue with paper in our house. I let it pile up and even put a humongo basket out just so I could pile endless amounts of mail and paper crap in it. Needless to say, piling things two feet deep doesn’t really scream organization. ;)
I got rid of the basket and now use a decorative box in the family room – I’ve been making myself go through every piece of mail that comes in the house immediately and anything that needs to be filed goes straight in the box.
I found the two categories of paper I had piled up most were things the Bub brings home (it’s just preschool and it’s already out of control!) and items I file away in the basement for long term use – keepsake items, instruction manuals, basically that stuff you don’t know what the heck to do with. :) So I found simple $6 containers at my most hated favorite place, Walmart:
048
They sit on the top of the bookshelf so there’s no excuse not to put the stinking stuff away!! Once they are full, I’ll be forced to take them to their home and file them away for good. That’s the plan anyway. Let’s see if it works. ;) I have a plan to make super cute labels for my newly decluttered bookshelf.
All the extras I found are going down to the basement – all in one spot, so I know where the heck to look when I need something! And don’t buy more! Stop yelling Sarah! ARGH!
Then, the deep cleaning started – I move (most) everything away from the walls and use the vacuum to get in that area right between the molding and carpet, where all the itty bitties and cat hair hide. (Anyone else hate that area?!):
067
Then I wipe down the baseboards if they need it.
I dust everything, including art on the walls, and the little crevices of knick knacks that won’t get cleaned again till next year:
043064
I clean up any spots on the carpet I’ve been ignoring for a year.  ;) And then do the basics like dusting, window cleaning, etc.
I moved a bookcase to a different spot in here just for a change and it left ruts in the carpet. An easy trick to help raise those spots up is to let ice melt on them:
004 006
I have been known to use a hair dryer to hurry up the process. :)
008
It still works but not quite as great as just leaving the ice alone. After it melts and dries, fluff it up a bit and it usually looks as good as new!
Ahhh…a clean, decrapified space is one of my very, very favorite things!!
    017 
It lasted all of three minutes and then the Bub made his mark again. But I had my three minutes!
There is something freeing about decluttering a space. Once you do it – you’ll be hooked! I learned a long time ago that no matter what your living situation – be it a dorm room, a teeny tiny apartment, or a huge house – if it is free of the CRAP, it will make you feel more in control of your life. It will free your mind! It’s a GREAT feeling.
Have you started? ;)