Showing posts with label fun stuff. Show all posts

Tuesday, June 29, 2010

My craft “room”

 029Well, it’s not really a room. There’s no real flooring, and zero drywall…but it works and I lurve it! I created this “space” a couple years ago, but recently have been making changes to make it function better and look cuter– as cute as cement walls and floors can get. ;)
The space started out like this a few years ago:

That would be a dumping zone. This is the first space as you walk down our basement steps, and because of that – everything just landed here. Well, most everything. It’s a big basement. :) Once this space was full, I would keep moving the piles around.
Last year, I added a folding table and shelving to hold wrapping and craft supplies and tools:
DSC00628A few weeks ago, when I started the massive decrapification of the basement (AGAIN), I made a few adjustments – I have learned the way I had things placed down here contributes to the crapifying of the space every year.
The first change was to move a shelf that had most of my decor items from the back of the basement to this area – I found having in the back corner of the basement made it rare that I would actually walk back there and put the stuff away.
So I moved it to this area. Then I realized how much decor STUFF I actually had, and ended up buying another new shelf to hold more. I did a lot of thinking about where I wanted everything else as well, and moved it all around to function better.
Once I had everything in the right spot, this is what I was left with:
046
Schnikeys. Ummm…this was better than the before before! WAY. Even though I had put the table and shelves in this area a couple years ago, it didn’t prevent it from becoming a dump zone. The table actually encouraged it really.
But, after some rearranging, a whole lotta decluttering, and some fun additions, this is what it looks like today:
034
Ack!! Isn’t it precious? Yes, I know, as precious as cement can get?!
After I moved the shelves around, I thought hard about where I wanted to put everything on them. I realized a while back that the reason the table became such a pit was because the shelf with my tools was on the back wall – and that’s the one I use the most.
So when I was done with a project – done mentally and physically mind you – the last thing I wanted to do is put all the tools away! It was so much easier to throw them on the table. Because of this, I moved all of my tools to the first shelf as you walk down the stairs:
043
Brilliant. It’s the simple things folks. Do you know how many cans of spray paint were usually thrown on the “craft” table? Because I didn’t walk the extra ten feet? I know, it’s only ten feet. But mentally, when you’re pooped -- it’s miles.
The two shelves of extra decor are next. It will make such a difference having these so accessible! I used to trek around to a dark corner of the basement to put this stuff away, so it eventually, it just ended up in piles. I’m a piler, yes I am. 042
I didn’t really need two sets of shelves, but I was determined to sort the decor stuff and make it easy to find everything. I purged and still have this much left! A lot of this used to be in bins – things like candles, frames, to-do projects. Having it all out in the open is SO much better!
I moved the shelves with the wrapping and craft supplies to the back wall. My goal is to USE the table to wrap or craft – so now they are right there where I need them!:
039035
Last year I came up with a way to store my wrapping paper, and it’s worked out GREAT! I drilled holes into the shelving and hung the paper rolls with twine:
041
Wrapping paper drives me nutty – all the unraveling, rolling, bouncing around. Argh! This has worked awesome! I love that they are out of the way and still allow for items on the shelf.
When I want to wrap something, I just hold it up, determine how much I need, then cut the paper. If the item is too large to hold up, it usually just goes in a bag.  :)
Once I felt like everything was in it’s place on the shelves, I moved on to the fun stuff. Whoohoo!
I decided a long time ago this spot would be as girly as it wants to be. I’m the only one who uses it, and even though I’m not what you would call a typical girly girl, I really wanted a space to just have fun with! Fun colors, fun prints, fun textures. This was the perfect spot!
The table is a simple folding table – and it is U.G.L.Y. on top. Last year I got some striped fabric and put it over the top with hot glue. This year, I wanted to amp up the fun and color a bit, so I went with this fabric instead:
031
Shut the front door…adorable. Aren’t the colors FUN? As you can see, I added the “skirt” with hot glue as well, so you can’t see these:
055
One is a bin I keep gifts in, one is a tool box for extra crap junk stuff.
The table cover fabric is from Hob Lob and was $6 a yard, 30 percent off. I only needed two yards. The fabric holds up surprisingly well! If I spray something like spray adhesive, or am painting, I just cover the table with scrap paper. (Usually the stuff they wrap my purchases with at Hob Lob!)
I literally hot glued it under the edges of the table. The skirt is leftover drapery lining and I glued that on too:
054
I wanted a cutting board for this table foreva, and decided to treat myself to one when I was done decluttering this space. It was $23 at Joann’s, 40 percent off:
020
Now I can craft, glue, cut, whatever, and not worry about the table. And it’s bright and happy! See the little green flower shaped thingy? It’s a silicon pot holder from Pier 1 – I got it for our kitchen, but realized today it would be the perfect little spot to rest my glue gun.
I tried it and by golly, it works!! (Yep, I sure did just say “by golly.”) The hot glue literally wipes right off of it. How stinking cute is that?
All the sudden I was finding the most adorable little accessories that worked with the colors:
019
The little clips ($1) and pencils ($2) were from Michaels – the pencils MATCH. Dying!!
Check out the eraser ($1):
008
I. am. dying.
Then I found this little pin cushion at Joann’s and couldn’t resist it:017
Hmmm…maybe I am a girly girl?  ;)
The organization of this space was HUGE part of this project. The color and little extras were fun to add. But the biggest change in this area was the lighting. As you can see from the first couple pictures above, there was just a single light fixture for the whole “room.”
Because my hubby often works down here during the summer (more on that spot later), we decided to add more outlets in the basement. Since the electrician was going to be here anyway, I asked him to add another light fixture in my craft area, and then a third light so I could swag a little fixture over the table.
I found a little brass beauty at the local ReStore last summer – it was spray painted and waiting in our garage all this time:
046
Let there be light!! It makes SUCH a difference to this area! It’s so bright and fun and now I can see what I’m doing when I work. Whoohoo!
I bought a glass lamp from Goodwill last summer as well. I took it apart and spray painted just the brassy parts with the same fun green:
037The $4 lamp shade was dressed up with a strip of extra fabric and some hot glue.
Can I get a “CAAUUUUUTE?!” Say it with me Squeezies!
My husband walked downstairs tonight and when he got down there, yelled up the stairs to me -- “Honey! It looks so cute down here! I love it!”
And that is why I love him. :)
The before shot that was really the half way shot, that’s how bad it was:
046 And my girly, bright after:
034
So worth all that work. I’ve got a few spring project I’ll be working on down here this week –- if they work out I’ll show you soon. Heck, I’ll show you even if they don’t.  ;)

Thank you to my sponsor:

Monday, June 29, 2009

It. was. awesome.

Oh my goodness people. I cannot even tell you how. much. fun. we had last night. I'm not even kidding. It was the time of my life!!! First, some pictures, and then you'll just die at the story at the end!!!!

Our seats were AWESOME, thanks to a former coworker of my sister/second cousin of my best friend (long story). We were right behind the sound stage. Thank God I'm 11 feet tall:

I kept standing on the railing around the sound stage, making me about twelve feet tall. The security guys were giving me the stink eye and a stern "GET. DOWN." look quite often. Whateva dudes. I waited 18 years for this:
Jared the Subway guy knew someone in the band and sat right in front of us. My goober adorable best friend and sister got pictures with him:
We went ALL OUT and got a limo -- here's a few shots. Me and my sis:
My hawty hawt shoes:
(Yes. I have blisters.)
My and my BFF. We've been best friends for about 23 years. Five NK's concerts together, and I wouldn't want to go with anyone else:
And a self portrait with the massive crowd behind us!!
So GET THIS. Before the show, my BF is Twittering Donnie (to my fellow twitterers (?) I'm sorry for the goofy posts last night!) and just to be funny, I twitter him our section, row and seats and tell him to come out to see us (we heard earlier that they come out in the crowd.)

Later in the show, the lights go down and all the sudden the guys are all spread out in the crowd. Donnie is immediately to our right, about five feet away. My sis and BF are over there in two seconds. I turn around and Joe is to my left, about five feet away as well. The seas parted and crazed girls grown women went screaming to each side of me. I stood like a goofball right smack in the middle, by myself, freaking out -- which way to go???

I was frozen. I couldn't decide. (Ladies, they were both smokin' hot. Smokin'.) I look over to the right at Donnie and there's this cute chick dancing with him, and I'm like, oh, she's cute! Oh, I hate her. Oh, she's cute though. But oh wait, look, there's Joe! Right there. Geez, that girl is still dancing with Donnie! I still don't know which way to go. Frozen.

I look over again...it hits me....
MY SISTER IS DANCING WITH DONNIE WAHLBERG. Wait. What? MY SISTER IS DANCING WITH DONNIE WAHLBERG!!!!!!!!!!!!!!!!!!!!!!!!!!!!!!!!!!!!!!!!!!!!!!

It was the most surreal experience of my life. I run over there, get on a chair and am about three feet from Donnie, eye level....

And I don't have a camera. Nothing. My phone had long died, I didn't bring in my camera, I had no idea where the other cameras were. I could have gotten the most amazing pictures of Joe and Donnie if I had one. I am hating myself right now!!

I don't even know if they get twitters from fans, but we thought it was so odd that he ended up right next to us. :) It was fantastic. My best friend has been a Donnie fan for 20 years and held his hand. We felt like we were 15 again, only better. :) It was the best concert I've ever been to, hands down. There are only about ten more concerts -- if you are not sure about going -- you MUST. You won't regret it. They know how to entertain!!

Thanks for letting me gush!! I feel like you are all my friends, so I had to share the night with you! And a big thanks to those of you who could care less about former teeny boppers for putting up with me lately. I swear, no more about it -- back to painting, crafting, decorating....I promise. :)

Sunday, June 21, 2009

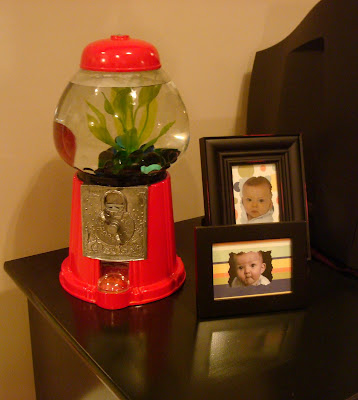
I shall call him Squishy.

I saw this project at least a year ago, probably more. I fell. in. love. I knew, one day, it would be mine. Well, Thursday was that day!! I have been had my eye out for a gumball machine for all this time, and last week there it was, at Goodwill!

I squealed with glee! (Really, I did. Out loud.) It didn't matter if it was $30, I was gonna get it. But it was only $10. Scha-wing!!

So this weekend, we welcomed Squishy to our family: He's a little shy. (He didn't realize a crazed bloggy woman was taking him home.) If you want to try this -- all you'll need for this project is the gumball machine, aquarium sealant and a cut piece of glass.

To start, take all the innards out of the gumball machine. This takes about ten seconds. Next, take the globe to a glass cutter to get a piece cut the size of the bottom. Mine was $3 and it took them five minutes:
Take the sealant (from any pet store, less than $5) and put a thick, chunky bead of it around the edge of the circle of glass, on top. Place it onto the bottom of the globe. Don't push too hard, so that the sealant all squishes out. You want there to be some between the two pieces of glass:

I was trying to make the bottom look at neat and clean, and they realized we'll never see the bottom with the marbles, so I just left it messy. I also took my (gloved) finger and spread it around the seam inside as well, to make sure the sealant was everywhere.

This is the view from the side (the aqua-colored piece around the bottom is what I glued on):

It has to dry for 48 hours, and then you can test it to make sure there are no leaks. After that, just fill with the fun stuff!

I used two packets of blue and green glass for $1.99 each, an a plant for $4:

I always wanted a fish for our son, and knew this was the only way to do it. With three cats in this house, fishy-fishy needs to be covered. Betta fish are different and can survive with less oxygen, and they tend to jump out of their homes (?!) so a cover is recommended.

This weekend we watched Finding Nemo, and it had me feeling major mommy-fish guilt about keeping this guy in a bowl. (Sheesh.) But it's one of my favorite kiddo movies, and the Squishy part is freaking hilarious, so I shall call him Squishy:
And over a gallon of water is better than the cup they have them in in the store, right? I saved him, he's not in captivity. :)Adorable. The pictures just don't do this justice. And the machine is a pretty deep red, not blaring orange red like in these I-took-these-pictures-at-night-and-they-always-look-like-crap pictures.

I am so excited for the winners of giveaway!! The winner of Beki's necklace is Beth Kohne and the winner of Bob's print is Molly from All about a girl and two boys. (Picked by Random.org.) Please e-mail me with your information and I'll get it to Beki and Bob!

P.S. Countdown to the NKOTB concert is ON BABY!!! WOOOeeee!!!

Monday, December 29, 2008

Cheap gift tags (FREE!)

First of all, thanks for your kind words about my last post. I appreciate hearing from all of you and to know I'm not the only one who feels that way sometimes. I know it is a GOOD thing to be so grateful, but I should try not to worry so much too. :)

So I have seen this idea a couple times in blogland and the first time I saw it, I knew this easy peasy project was just for me. Do you keep your old Christmas cards every year?? I do. Don't have a clue why -- I do the same thing with birthday cards, I can't let go of them.


Well it's like I've kept them all these years JUST for this! All you need is a puncher outer thingy:


(Ignore my banged-up coffee table. I like to call it "rustic" a la The Bub.)


Grab a card:


You may have to do some trimming to get it to fit in the puncher right. I turn mine upside down to see what I'm punching. I do it on the floor too -- much easier to punch. (These things are a work out!!):


Voila!! Instant tags for next year! I even cut out some of the messages inside the cards:


Aren't they just ADORABLE?? Caaaauuute I say! I am dying to get my hands on more cards from this year. I'm trying to be patient and am keeping them up just a couple more days. Argh, I HATE delayed gratification!!

These were some of my favorites:


The puncher was originally about $15, but I got it half off. Otherwise, this is F.R.E.E. chickees! Have fun!
**Edited to add: YES the photo cards make this harder -- I know they are easier people, but come on...I need tags!! BUT I forgot to mention that I took the puncher thingy to some of the cardboard gift boxes that were torn up. (The one's with a design on top.) Those are adorable too!

ALERT!! The puncher thingys are half off at Hob Lob this week! Run, don't walk!

Thursday, December 11, 2008

An advent calendar done. (12 days late!)


So what if it's supposed to be for the 24 days before Christmas? The Bub is two and he doesn't really understand why there's only been an advent box every few days or so, with the wrong days on them. (Yesterday was "22." Yeah.)

But now, we'll be good to go for the 12 days before Christmas. I get some credit for that, right? :)

I showed you the start of these here, but I just couldn't get back to them, what with all the fluffing and glittering and greenery-puking and ten-foot trees falling...(no, the stain never came out, $100 later. Pout.)

I am IN. LOVE. with these little boxes of caa-uteness. I hope my son gets giddy at the sight of them for many years to come, just like I do right now when I look at them. Here they are all fresh and clean:


You all had GREAT ideas of going and using a die-cut machine (or whatever it's called) to cut out the numbers. One of my girlfriends is a teacher and I almost went to her school to hold that thing hostage for an hour or so, but instead just bought regular foam and used my cardboard numbers as a template. I cut out around them with the x-acto knife and it was SO much easier than the glittery paper. Then I glittered up the numbers:


This project really wouldn't take so long if I didn't bling these up (there I go again) so much. I put brads, stickers, little dots, foam stickers, all kinds of stuff on there:


Sigh. I love these things. (You should be able to enlarge this one.)


Check out Carrie's version here -- love how she hung them all together! I may have to do that next year. If you watch for these little boxes to go on sale, the price for all 24 is $12. The extras only cost me about six bucks. I think it's worth the $18 considering we'll use these for years.
Hope you enjoy it! Back with more soon!


**Edited to add: I'm going ahead with the Christmas tree party! Here's the blinky:

I'll kick this off on Monday. Have fun!!