Showing posts with label molding. Show all posts

Sunday, June 27, 2010

Make it work!

 064
I’m totally channeling Tim Gunn on that one! :) I told you awhile ago how I was obsessing over wanting to move furniture around in our house. I also mentioned how that just doesn’t happen often in our house because of the open layout. Poor me, I know.
But one day a couple weeks ago I was standing in our loft/playroom and found myself staring at a corner that drove me nuts:
DSC00009
It’s that area over by the window – the bookshelf has always bothered me there. It just felt too cramped – especially when every. single. book. is taken off the shelves. I either wanted another shelf for the other side of the window to balance it out or wanted to move it out of that spot completely. I couldn’t get a second bookcase because it’s actually a hutch that goes on top of a desk – and I got it on my one and only glorious trip to the local Ballard Designs outlet years ago. We went with an empty mini van and couldn’t see out the back window on the way home.  ;)
Enter the moving of furniture. I slid the sucker over by our stair way and it turned out to be an absolute perfect fit!:
015I was worried it might get in the way, but we don’t even notice it. The other thing I have wanted to do forever? Add some kind of base to the hutch to make it look like actual furniture. I mean, it looked like it belonged on a desk, not on the floor:
017
So I thought up a solution I think turned out pretty well. I measured the size of the top of the hutch, then went and had a piece of wood cut to the same measurement. I also grabbed six “bun” feet to raise it off the floor a bit:
 007 008
I measured the same distance in all around and drilled starter holes for the feet:
 009 010
The bun feet didn’t really twist in super tight, but they work fine. I also got a piece of trim molding to dress up the base of my new “bookcase” and cut it with my miter box to fit around the front and the two sides:
011 013    
A coat of my trusty Black Suede paint from Home Depot and it was done. I absolutely love how it turned out!:
   065
It’s just that little something it needed! I removed the meeeellion stuffed animals and now it’s such a lovely, warm spot when we go up and down the stairs:
067See that little dinosaur terrarium on the top shelf? Adorable. Cost me a buck. I got that idea from Lindsay. (Can’t find the link, sorry!) My son loves it!
I didn’t attach the base -- just set the bookshelf on top! The accessories can be seen as you come up the stairs, so because I’m just a little bit crazy, they had to be items that look good from both directions – which is harder than you’d think, especially when you’re shopping your house!:
056I ended up securing it to the wall (into a stud) because it’s way less sturdy compared to before, which is odd now that it has a wider base:
022  070
The corner where the shelves were before is SO empty now, which I’m OK with for now --- I’m enjoying all the space.
Before:
DSC00009  After…ahhhh:
076
But now I have an idea for something fantastic by each window! Yippee! I love moving stuff around!
I’m working on a mini redo in our family room I hope to show you soon. It started with a rug and it’s spilling into the rest of the room.  :)

Thursday, June 24, 2010

More examples of my obsession

So now that I've explained how to add molding to your home, I thought I would share more ways I think it has transformed our house.

Our master bathroom is one of my favorite examples. We have extremely high ceilings that I painted with a mossy green color. After a while I realized how dark it was in there, but there was NO WAY I was repainting those walls again. I thought about adding tile around our tub, but figured it would be at least $1000 to do that. So I ended up using molding around the tub to lighten up the space.

Here is the before:

Photobucket


And here is it after, with the magic of molding! :)


Photobucket

Photobucket

I added rectangles to the walls around the tub with molding, a chair rail around the top and painted it all out white. Then I used beadboard around the marble base of the tub and painted it a shade darker than the walls.

The BEST PART! This whole project was $40! The molding is the only purchase I had to make -- the beadboard was leftover from another project and the paint I already had. You can't beat it! We'd still like to change out the tub fixtures, but that will be later -- for the plumber. :)

Do they have a support group for me?

I am obsessed with molding in our home. I mean, seriously. Obsessed. I can't even remember the first project I did with it, all I know is I've always loved the look of wainscoting, beadboard and chair rails. So when we moved into our house, I set out to figure out how to do it on my own. I've gone from using an electric saw (REALLY REALLY not the best idea) to cut my wood and pounding in every nail with a hammer to now using my trusty miter box and a nail gun. The next level would be to finally just get a table saw to cut the wood, but even I'm not there yet.

Molding, I believe, is hands down the No. 1 way to update the look of your home. It makes it feel fresher, more customized and it sets your home apart from all the others in your neighborhood.

The greatest part about molding is it is easy to do. I'm not just saying this -- it really, really is. I was handy with a hammer before we moved into our home, but nothing else, so if I can do it, so can you. There are three main tools you need to install molding:
  • A miter box with saw. These come in a set for about $8 at any home improvement store.

  • A level. These vary in size and price, but all you need is a little one that will cost a few dollars.

  • A nail gun. I know, not quite as simple as the other two! If you don't have one, you can rent it from any home improvement store. They are SO simple to use -- just plug it in, let the air fill up the tank, and put the gun against your surface and shoot. It is FUN to use a nail gun. My first time I put about 20 extra nails in, for good measure. I just couldn't stop!
  • If you don't want to use a nail gun, just do what I did when I started out...nail every hole in. It takes longer but it works just as well. Use a drill bit to drill a hole for the nails though, because the wood may split if you just hammer the nail in.
Once you have your tools, it just takes measuring to see what length you want your squares. Use your miter box to cut the ends of the molding at 45 degree angles. That way, they match up in the corners to create a box. Make sure the wood is level before nailing in, and then go for it. I like to paint my projects white when everything is installed. It gives it a nice, crisp look. This is what I did to the island in my last post, but with black paint obviously.
Here's another example:
Photobucket
Photobucket
Once you do it one time, you'll be a pro!! The best part -- it's CHEAP. The molding is typically comes in 8 foot sections and these run anywhere from $3 to $10 a piece. So you can transform your room, stairway or hall with around $25 to $100, depending on the project.

Sunday, November 8, 2009

The squares on my walls.

I hope you had a wonderful weekend! We had a great one -- full of marching band. ;) I swear I feel like I have 300 more children every weekend, I am so proud when I watch them perform. Sniff.

Today I'm not feeling so great -- no fever thank goodness, just general crap. Hopefully I can sleep it off tonight. I cannot stand being down and out. Gives me hives!!

So yes, this is yet another post about molding. I swear after this I won't mention it again for a whole WEEK! OK, maybe a month. Grumble. I got so many questions about determining the size of the boxes, so I thought I would answer that, and while I'm at it, show you the various ways I've used molding around our home...

The family room I worked on just weeks after the Bub was born. I was itching to get back to "normal" -- doesn't everyone feel like that? So a home improvement project was in order to scratch that itch. :) The Bub was in his bouncy seat the whole time I did this room -- and he slept through the whole thing!:
I used the foam molding in this room, and many of you who have seen pictures of our family room have asked about these boxes. I used a large stencil (I get mine from Hobby Lobby) to make the design inside the boxes. I wanted it to be really light and barely noticeable, so I used my faux iridescent paint only for the stencil.

I have loved it for years, but every once and a while I want to get rid of the swirls. They are fun and very subtle, but now I have a new look in mind. I'm thinking I'm going to paint the insides of those boxes with a color slightly darker than the walls. Stay tuned for that one!

In our chocolate powder room, I used real wood for the chair rail (I wanted it real thick and chunky) and the foam stuff for the boxes:
I never even painted them!:
Love that stuff!

The million dollar question -- how big do you make your boxes? It's a bit of math (ewwww!!) and some trial and error. First, you'll need to measure the wall. Then, decide how many inches you want between all of your boxes. I do a standard three inches all the way around:
Say your wall is 14 feet. (They are rarely a perfect number like that, for explanation purposes, let's go easy.) Fourteen feet is 168 inches. So maybe you want six boxes on that wall -- take out the three inches next to each box and figure out the final number. If we did six boxes, there would be seven three inch sections equalling 21 inches. Take 21 from 168 -- the number you have to work with is 147 inches.

Like this:

3" (box) 3" (box) 3" (box) 3" (box) 3" (box) 3" (box) 3"

Take the remaining 147 inches and divide it by six boxes -- each box will be 24.5 inches wide. Does that make sense? If you want to vary the sizes of the boxes (I do this often) -- decide on the larger size first and then figure out what you have to work with to determine the smaller sized boxes.

I highly suggest starting at each end of the wall, and working in. So if any are slightly off, it will be the middle box on the wall. If it's off just a bit, it will look like it's supposed to be, since it's in the center. This has saved me a couple of times. ;)

I also use molding to highlight parts of our home -- the columns between our living room and dining room:
Our super duper tall staircase:
And the half wall in our loft:
This molding was from Home Depot and is plastic! Can you believe it? It's in the molding area, but down at the outdoor trim area. It's got a great shape:
They cut like butta with a miter box and saw. Awesome.

Oooo, I almost for got our master bathroom!:
Told you I need a support group for this stuff. Don't worry, there are plenty of rooms in this house that don't have it. Darn it.

So I hope that helps! Did I make sense? Remember, you do not need a nail gun to do this in your home. It just makes it a heckuva lot more fun. ;) If you do it with a hammer and nails, you'll want long finishing nails and a drill bit to match. Drill into your wood first, then put the nail in and hang the molding. If you pound a nail in without a hole first, it will most likely split the wood.

Let me know if you decide to do it!! I'd love to see. You'll be hooked, watch out. Serious.

Friday, November 6, 2009

The difference molding makes.

Well it's done. Not completely, but I gave up on "completely" when the Bub was born. ;) There are a few touch ups to do, but I'm sure I'll get to them next week, next month, in a few years.

I am soooo pleased with how this project turned out. After looking at it now, I wonder why it took me so. many. years. for it to occur to me to add picture frame molding in this room. DOY.
I had done the molding in the foyer about four years ago, (using nails, a miter box and hammer, thankyouverymuch). Now, it continues throughout the whole front room and looks loverly:

On an unrelated note -- why does it take me looking at pictures to see the Halloween stuff I didn't see walking right by it 15 times? I swear I find decorations months later in random spots.
I luuuurve it under the windows too:
For this room, I wanted a very traditional look, which for me is white on white. I used white high gloss on the whole thing:

Many of you had questions about molding and how to do the finished edge, so I did another video (I think I'm hooked) to answer some of those:

So here is my favorite part...here is this room years ago, when I was trying to figure out what the heck to do with it!:
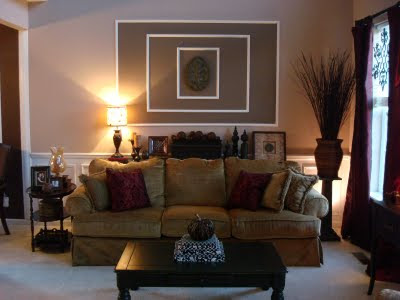
More recently, with the addition of some molding above the sofa:
Now, even though the sofa cover most of the wall, the molding just totally finishes it off. Nice.
The reason I decided to go ahead with this project right now (I swore I was not doing any other big projects till after Christmas!), was thinking how beautiful our Christmas tree will look in the corner with the molding as a backdrop. Can't you just see it?:
Uhhhh...I mean, can't you just see it?:
Uh huh. Yes. It did fall down. If you were here last year, you remember that. :)
Yep. Ugh.
Have a fantastic weekend you Squeezies!!

Wednesday, November 4, 2009

How to install molding (with videos, yikes!)

For a few weeks, I've been feeling like something was missing in my life...an itch that needed to be scratched. I felt a longing for something, but I couldn't put my finger on what it was. Then, one day, looking around our house, it hit me...I haven't done a molding project for EIGHT months. Good God, that's like a millennium in Sarah time.

I needed to squelch the need for molding STAT. I knew just the project to attack. I decided to add picture frame molding to the living room so it would continue around the room from our foyer. Here's what I did years ago (the pic is from years ago too):

So I took a trip to the greatest, most amazing place on earth. That most amazing place would be Lowe's. My Squeeeeee-zay Lowe's.

When I pick out molding, I lay it out on the floor to make sure it lays fairly flat and straight before I buy it:

This is the part when about 15 sweet Lowe's employees come up to me and ask it I need any help. Little do they know, I am very familiar with my lovely molding. We are tight.

I have been wanting to make a video for you all for months now, but couldn't' figure out the right topic. When I started this project, I realized it would be perfect!!

I'll have you know, I took one take each peeps. No rehearsal. No make up. It's scary.

Things you need to know before watching:

1. My eyes may look like they are as big as saucers, but they really aren't. (I don't think.) For some reason I look like I'm buggin' out. My hubby has always told me my eyes are his favorite feature of mine, but now I'm wondering what he's seeing. All I'm seeing is B.U.G.

2. I guess I have a turkey neck. It's been 34 years and I didn't know this until now. It's really, really pretty, let me tell you.

3. You'll see the back of my head for an extended period of time and my hair color looks really nice. I like it. Hope you do too.

4. I'm trying to decide if I should cut my hair again or grow it out. And it shows. ;)

OK, enough about me and my issues with the videos. The first is introducing myself, like you don't know who I am:


I showed you how to cut molding on this post back in March.

In this video, I show you how easy it is to get this stuff up on the wall:


All of the molding in our foyer was done before I had a nail gun, so you don't have to have one. It just makes the process much quicker!

I had my finger on the microphone for the next one, so I had to redo it. I'm new at this peeps, bare with me:


Whew, I need a nap. Or a drink. Or somethin'. Be kind to me people. ;)

I will show you the final result later this week! Only one more coat of paint to go and I'm done.

Tuesday, September 29, 2009

The fifth wall. (And another dining room reveal!)

OK peeps. I've been wanting to talk about this topic for awhile. It's something very few do, but it makes a HUGE impact in a room. (In my little bitty opinion.)

The decorating element I love to add to a room is one most people never think of doing -- painting your ceiling. Not another coat of white -- a color. EGADS! Yes, I said it! Color on your ceiling! Ahhh, I've gone and lost my mind, right?

It is by far the one addition that I think makes a HUGE difference in the way a room feels, and it costs $20 for a gallon of paint.

The owner of the decorating firm I worked with turned me onto this, and I was SUCH a nonbeliever at first. I was hooked after our first painted ceiling though. I mean, head over heels in love, hooked. There are some "rules" that you may want to follow that I don't, and I'll tell you those in a bit. Also, there are some myths about painting a ceiling I'll address too.

I had the ceiling in our family room/kitchen combo painted the same color as the walls and absolutely love it:
Reason number one I love painted ceilings -- if you have crown molding, it will make them absolutely pop off the walls when your ceilings are painted. When you have crown and a white ceiling, at least the upper half of it washes away, and for all that work and money, you should SEE it. ;)

I am chomping at the bit to get the crown installed in these rooms, because I know it will look ahhhhmazing against the Sisal colored walls and ceiling. ;)

In our chocolate colored powder room, I painted the ceiling the same color as the walls, and look how the molding pops!:
I added a thin coat of my glaze over the paint, just to give it a little bit of fun. (I think you can do whatever the heck you want and get dramatic in three rooms -- laundry rooms, powder rooms and dining rooms.)

In our son's bathroom I did the same blue as the ceiling in his room:
I didn't go the same color as the walls in these rooms because I wanted to tie in the blue that was used throughout, I wanted it to give the look of a sky, and it was just plain cute:
We don't have overhead lighting in our den (pounds head on table for that), so it's the darkest room in our house. I went with the same color of the walls to keep the cozy feeling we had going:
And I. love. it. (I'm going to install crown in here too, forgive my horrible cutting in...)

There is a common thought that painted ceilings make the room darker -- this is only true if the room is small, has low ceilings has little lighting. If I did a dark color on the ceiling in our master bathroom, with tall walls and tons of natural light, I can promise you it would not be darker in there. Swear. Bet you one meeellion bucks.

Another thought is that it make the room seem smaller. Even a small room like our den didn't shrink -- I swear it got bigger. When you remove the white ceiling, the eye just keeps going...it doesn't stop. I make the room seem more expanse and taller...YES, taller. When the ceiling is white, it stops your eye and shows exact height of your ceilings.

My first attempt at a painted ceiling was years ago. I wanted to give the illusion (there I go with illuuuuusions again!) of a tray ceiling in our dining room, so I put up molding, and took a color out of the light fixture for the inside of the molding:
I added a glaze to the top to make it glitter just a bit, and at first we loved it. It has stayed like this for years, but with the recent dining room redo, it just wasn't working anymore. I had the ceiling painted a couple weeks ago (I splurged and called my "guy" I use for ceilings when I'm feeling lazy) and had him leave the color on the inside, thinking it would look cool: Ummmm, it didn't. It looked like baby puke.
So in about an hour and a half, I finished it up and continued the chocolate brown:
And I adore it. (Oh yeah, I'm waiting on a special little somethin' for that empty area to the right of the table...patiently...waiting...)

The light, I have always loved...

But now I'm craving something more traditional...is that wrong? I spent a pretty penny on this light. I can't believe I'm considering this. Yikes. I have a spot where I may be able to put it, but I'm not sure what I'll do. Thoughts?

There are general guidelines "they" say to use when painting a ceiling. The first is, if your ceilings are eight feet or lower, go half and half with the color -- like half white, half wall color. Or at least take the wall color lighter a few shades. Also, if you are painting ceilings in small rooms, the general thought is to go lighter.

If your ceilings are nine foot and taller, you can go the same color as the walls. If they are VERY tall, I'm talking like 15-20 feet -- you can darker than the walls. This is for instances when you want to make such a tall space cozier and not as cavernous feeling. And it works!

My rules are...do whatever the heck you want! I almost always do the same exact color that's on the walls, no matter the size of the room or ceiling height. You can do a different color, you can go lighter, darker, whateva. I highly recommend flat paint though. Any other finish will be too shiny. If you want some shiny, use a glaze like I did to glam it up...but do it sparingly.

Painted ceilings are not for everyone. And you will be sceered, verrrry screered the first time you do it. (Heck, the fifth time you do it!) But I have yet to regret one of them in our home.

Next up...I'll show you my cheap-o hutch redo!

P.S. I believe I said "ceiling" 267 times. 268.
P.S.S. I am finishing up answering your questions on my Q and A post tonight! That was FUN!