Today I'm not feeling so great -- no fever thank goodness, just general crap. Hopefully I can sleep it off tonight. I cannot stand being down and out. Gives me hives!!
So yes, this is yet another post about molding. I swear after this I won't mention it again for a whole WEEK! OK, maybe a month. Grumble. I got so many questions about determining the size of the boxes, so I thought I would answer that, and while I'm at it, show you the various ways I've used molding around our home...
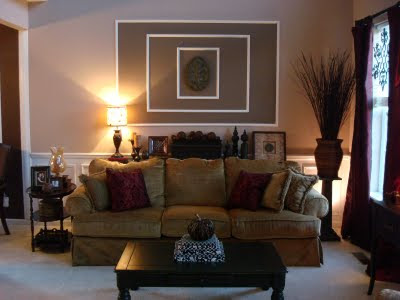
The family room I worked on just weeks after the Bub was born. I was itching to get back to "normal" -- doesn't everyone feel like that? So a home improvement project was in order to scratch that itch. :) The Bub was in his bouncy seat the whole time I did this room -- and he slept through the whole thing!:
 I used the foam molding in this room, and many of you who have seen pictures of our family room have asked about these boxes. I used a large stencil (I get mine from Hobby Lobby) to make the design inside the boxes. I wanted it to be really light and barely noticeable, so I used my faux iridescent paint only for the stencil.
I have loved it for years, but every once and a while I want to get rid of the swirls. They are fun and very subtle, but now I have a new look in mind. I'm thinking I'm going to paint the insides of those boxes with a color slightly darker than the walls. Stay tuned for that one!
In our chocolate powder room, I used real wood for the chair rail (I wanted it real thick and chunky) and the foam stuff for the boxes:
 I never even painted them!:
Love that stuff!
The million dollar question -- how big do you make your boxes? It's a bit of math (ewwww!!) and some trial and error. First, you'll need to measure the wall. Then, decide how many inches you want between all of your boxes. I do a standard three inches all the way around:
The million dollar question -- how big do you make your boxes? It's a bit of math (ewwww!!) and some trial and error. First, you'll need to measure the wall. Then, decide how many inches you want between all of your boxes. I do a standard three inches all the way around:
 Say your wall is 14 feet. (They are rarely a perfect number like that, for explanation purposes, let's go easy.) Fourteen feet is 168 inches. So maybe you want six boxes on that wall -- take out the three inches next to each box and figure out the final number. If we did six boxes, there would be seven three inch sections equalling 21 inches. Take 21 from 168 -- the number you have to work with is 147 inches.
 Like this:
3" (box) 3" (box) 3" (box) 3" (box) 3" (box) 3" (box) 3"
Take the remaining 147 inches and divide it by six boxes -- each box will be 24.5 inches wide. Does that make sense? If you want to vary the sizes of the boxes (I do this often) -- decide on the larger size first and then figure out what you have to work with to determine the smaller sized boxes.
I highly suggest starting at each end of the wall, and working in. So if any are slightly off, it will be the middle box on the wall. If it's off just a bit, it will look like it's supposed to be, since it's in the center. This has saved me a couple of times. ;)
I also use molding to highlight parts of our home -- the columns between our living room and dining room:
 Our super duper tall staircase:
 And the half wall in our loft:
 This molding was from Home Depot and is plastic! Can you believe it? It's in the molding area, but down at the outdoor trim area. It's got a great shape:
 They cut like butta with a miter box and saw. Awesome.
 Oooo, I almost for got our master bathroom!:
 Told you I need a support group for this stuff. Don't worry, there are plenty of rooms in this house that don't have it. Darn it.
So I hope that helps! Did I make sense? Remember, you do not need a nail gun to do this in your home. It just makes it a heckuva lot more fun. ;) If you do it with a hammer and nails, you'll want long finishing nails and a drill bit to match. Drill into your wood first, then put the nail in and hang the molding. If you pound a nail in without a hole first, it will most likely split the wood.
Let me know if you decide to do it!! I'd love to see. You'll be hooked, watch out. Serious.


 For this room, I wanted a very traditional look, which for me is white on white. I used white high gloss on the whole thing:


 The reason I decided to go ahead with this project right now (I swore I was not doing any other big projects till after Christmas!), was thinking how beautiful our Christmas tree will look in the corner with the molding as a backdrop. Can't you just see it?:

 So I took a trip to the greatest, most amazing place on earth. That most amazing place would be Lowe's. My Squeeeeee-zay Lowe's.


 Then got a little wooden tree from Hob Lob, painted it, and hot glued a magnet to the back for the countdown marker:


 Oops! She did it again... Martha never fails to amaze me:


 I feel like I should title this post "Lamp Pass and Lamp BIG FAT FAIL." I recently redid two lamps and only one turned out like I had hoped. The other...well...notsogood. The first started when I found this cutie little drum shade at Goodwill for $2.99:
 I was just going to cover the denim, but when I went to remove the trim, it all came off pretty easy. Then I realized I could just peel the fabric right off the shade. Who knew?:


 I LOVED the shape and size. The color of the wood, not really. I already have three spray painted lamps in our bedroom, so I was really hoping to stain this one instead.
  I was so stinking excited, thinking how GORG it would be with my walnut stain!
