Happy Mother's Day! (Late.) I had a wonderful day with my two men (the little one and the big one), and then while Hubby had to do a high school musical (not
the high school musical), my girl friend and I took her Mom and our four boys for a picnic, some playing at the park and a fun hike.
My little family ended the day with a Kentucky Fried Chicken dinner -- it's what I wanted and
Momma gets what she wants. (At least today I do.) I hope all of you who are Mommy's had a wonderful day, and I hope all of you that are waiting to be a Momma had a wonderful day as well. :)
Anyhoo, you have probably guessed by now that the island redo involves beadboard. I just
had to cover the laminate -- since I didn't use the primer and the paint was coming off in most spots, I was
really over it. So I just decided to cover the whole freakin' thing. And
I LOVE IT.
So I wanted to show you how to install this luscious stuff. First of all -- if there is any trim on the island, or on the wall you are working with, you'll need one of these thingamagigs. The name of them has completely escaped me. Soooooo tired people:

You'll want to use a rubber mallet with it, and this will probably be the most fun you'll have on the whole project. Don't be afraid ladies! Smack that baby! Tear it up!!
If you are installing beadboard on a wall, I recommend you remove the baseboards first. You don't
have to by any means. It will just look more custom when you reinstall the baseboards over the beadboard. On the island, I removed the corner molding and the quarter round.
If there are any nails from the molding stuck in the wall/island, just use a wrench to pry them out:

Next up, measure the height you need and cut away. In my
laundry room, I did it fairly high, around five feet. In our son's bathroom, I did it at about 33 inches. The latter is pretty standard. Basically, any height goes!:

You'll need a good glue, like liquid nails. Put a bead of it along the back of the board:

I recommend nailing them in as well, but you don't have to. It helps to keep the boards secure while you are working and keeps them from moving around while the glue dries. I use a nail gun, but you can just use a hammer and nails. I nail the bottom and top of each board.
Use a level and check it. The first piece is most important. And beadboard is sooooo forgiving...if subsequent pieces aren't perfect, you can make them level even if there is some space between them. After it's painted you won't even notice little imperfections:

I find this next step
very important -- before you nail each piece, check the next one to make sure they will slip together OK. Then, you'll want to pull the edge of the piece you just glued on up a bit on the side that slides together. Then slide your next piece on, and nail in the previous piece. Does that make sense? If you nail one beadboard piece down, it can be really hard to get the next one in, just because it's so close to the wall:

Basically, you just want to keep some "give" when you put up the next piece.
I should mention here that you can also purchase large sheets of "faux" beadboard and have it cut or cut it the size you need. It's just a large panel, so the installation is much easier -- glue the panel up and nail in a few spots to secure it. I just love the look of real beadboard and I think it's fun to install. The pieces lock together kind of like flooring.
Take your mallet and tap each piece into the next one, checking level as you go (or at least every few pieces):

If you have to work around an outlet, you'll have to use your hand saw to cut shape out that you need. To get the vertical cut, (like to the right of the outlet here), I used a blade and scored it well, then just popped it off with a wrench. Especially if you are painting it black, you will never see any little imperfections:

Like I said, beadboard is very forgiving.
I know, fo sho.
That's basically it. Bead board is EXTREMELY easy to install. The hard part is getting the pieces cut. Here's a few tips:
1. If you have an electric saw, this helps immensely. I did most of the island with my miter box and hand saw before my hand was about to fall. off. With the miter saw it was like I had died and gone to heaven. (I cannot believe I haven't bought one till now.) If you have a compound miter saw, make all your cuts beforehand, and installation will be a breeze.
2. If you don't have a saw, the home improvement store may cut them for you. Their blades are pretty heavy duty and beadboard is not. So they may or may not do it - ask them first. If you don't want to cut them by hand with a miter box, you'll have to find someone who has a saw to help you out.
3. You'll have some spots that will need skinny pieces of molding -- like when you get to the end of a wall. Again, the home improvement store may not cut this for you. Helps to have a friend for this part as well. Good thing is, you will need very few of these cuts done. And again, they don't have to be perfect. Caulk is your BFF.
I will show you the final pics of the island tomorrow. Stop yelling at me! I know!! I took some tonight and they look like crappola, so you'll have to be a little more patient so I can take them in the light.
Tomorrow I'll share how to deal with corners and how to paint beadboard. Have a wonderful Monday!
P.S. I said "piece" about 76 times in this post.
 Gorg, huh? My azaleas are my pride and joy! Luuuurve them:
 But. Last year, some blasted, nasty, hateful vermin dug into the ground and ate the root of my middle azalea. CRY! I don't think I'll ever find the exact bush I have, let alone one this big. These have been growing for five years now.
  Looks like a snake hole huh? Here's another:
 PLEASE help! Anyone have any idea what this is? We thought maybe a chipmunk? A vole? Help!
 This was thin foam, so I just used scissors to cut it out. I like to use spray adhesive on my foam and the surface, just cause HGTV says so:
 Use your staple gun to cover the foam and chair with batting. This part does not need to be perfect:
 Then cover everything with your fabric. If you are using a print or solid, this will be easy. If it's a stripe, like mine, it will take a little more care, to make sure the stripes stay straight:
 See that price tag? Garden Ridge baby! (Buy one get one half off -- total of $120 for two counter height chairs.) Reattach to the seat and you are DONE folks!
 Two tips to keep in mind -- pay attention to the screw holes when you cover the seat. Cut the fabric around them so you can easily get the seat back on the chair. Also, make sure you have enough to cover it so that when you put the seat back on, there's no fabric hanging out. You don't want this:
 ARGH! I hate when I forget my own advice!! I'll be touching that up with hot glue. Dang.
 The after:
 The chairs were always too tall for the island, so I cut down each leg two inches with my Lovah Miter Saw. Awwww yeah...


 I used casing (made to trim out windows) around the bottom instead of baseboard or quarter round. I loved how chunky they were and the beaded detail around the top:
 Here's a few more tips I have discovered. When it comes to outside corners, I use dowel rods to fill in the corners. You can get them in just about any size you need. The skinny dowels, when painted the same as the wood, look just like the bead that runs down the beadboard. It works every time. You can't even tell where they are:
 I realized today spray paint may work well to do at least the first coat. It would take very light sprays but I think it could work. The island took one coat of tinted primer and two coats of black. My right hand looks like a claw right now. :)
  Here's it is after it's first makeover, with paint and molding:
 Here it is today. It's never changing again people:
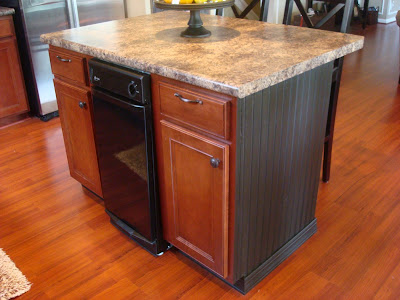


 I sanded this island within an inch of it's life. I'm not kidding. Then I used liquid sander. You see what still happened when I started taking off the molding yesterday?:
 And some of this...


 Now I store cleaning supplies just for upstairs and have turned this into a game closet as well.
 If they had a support group for Labelers Anonymous, I'd be the first member:
 You can see what's in the bin, but I have to label it. Just in case Hubby gets in a tizzy and decides to clean the whole house -- he'll know where everything is.
  I keep an empty bin in this closet for kitchen towels/Bub socks that I don't know what to do with. It's nice to have a "laundry bin" for random stuff downstairs.
 I can't tell you how nice it is to know exactly where to look for something. Freakin' fantastic!!


