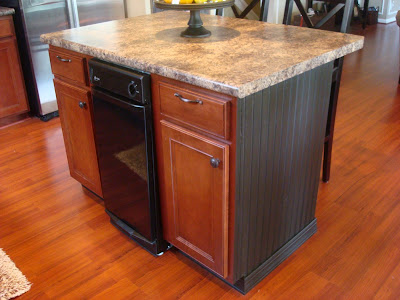
 Oh my goodness, I luuuurve it.
I added corbels to under the counters and love how it turned out. I bought scrolly fancy ones a while back just for this project, but they were too much. I love these simple corbels, they look like they are meant to be there:
 I used casing (made to trim out windows) around the bottom instead of baseboard or quarter round. I loved how chunky they were and the beaded detail around the top:
 Here's a few more tips I have discovered. When it comes to outside corners, I use dowel rods to fill in the corners. You can get them in just about any size you need. The skinny dowels, when painted the same as the wood, look just like the bead that runs down the beadboard. It works every time. You can't even tell where they are:
Hands down, the hardest part of installing beadboard is painting it. Obviously, there are ton of grooves you need to get filled in. I always paint a small section with a sponge roller first, then immediately use a small sponge brush to fill in the grooves. When you use the roller, the paint will get into the grooves and puddle up, and you have to get in there with a smaller brush to get that paint smoothed out.
 I realized today spray paint may work well to do at least the first coat. It would take very light sprays but I think it could work. The island took one coat of tinted primer and two coats of black. My right hand looks like a claw right now. :)
 I will poly over this whole project, but I'm going to wait a bit, which brings me to another tip. Beadboard is like flooring, in that it needs to acclimate to your home. It will expand and contract if you install too soon. (I did it too fast in the laundry room and now it needs to be repainted.) To prevent this, it's ideal to leave it flat, in the space you are installing it, for a couple days. I was good about that this time -- I left it standing up. In the garage. For a day. So obviously, I'm going to wait a week or so to poly just in case touch ups are needed. :)
One more tip -- don't be scared to take off the molding before you start (like I mentioned in my last post). If you have to tear up the wall a bit to get it off, don't worry. The fantastic thing about beadboard is it covers all sins.
Here's a before of the island:
 Here's it is after it's first makeover, with paint and molding:
 Here it is today. It's never changing again people:
Next project, upholstering the chairs...can't wait!!
Here's my dirty little secret though -- I've never painted the cabinets on the island. I was way too sceered to do it before, but now I think I'm ready. I think the whole thing in black will look fab:

For now, my hand needs a major break. Thanks for your patience! I hope you are inspired.


I'm wondering why you didn't paint the cabinets to match the back of your island?
ReplyDelete