Monday, April 13, 2009

Make a sofa table for under $20. (For real.)

First of all, I hope you all had a wonderful Easter! We had a great one -- lounged all day. Well, I did. Hubby did some work outside and I napped, blew bubbles with the Bub and ate all day. A wonderful day with all of us at home, which is my favorite kind of day.

As promised, I'm going to share how I made our sofa table in the living room I showed you here. Before I do that, I have to get on my soap box about getting your furniture away from the walls!!

I've done this where possible in our home and love how it makes spaces more cozy, more intimate. In our family room, it would have been easy to put all the furniture against the walls:

But instead, I moved them away and created the sitting area. Sometimes it can be a pain...I mean, I have to walk a whole extra five steps to get around the sofa. But it's worth it.

In our living room, I wanted to do something similar and tried a few layouts, but with only one wall in the whole room, I had to end up placing the sofa there. I told you how I wanted to add more height to the sofa...so I knew a sofa table would be the perfect solution.

Have you ever seen an eight foot long sofa table? Me either. I knew I had to make my own if I wanted one. So I did, for under $20. Here's what you do --

Measure the length of the sofa. Measure how tall you want the table to be.

Go to Lowe's, have a board cut to the length you need it. I chose one that was nine inches wide, but you could do whatever you want. Then get more of the same board cut to the height you need. Depending on how long you want it, you'll want enough for each end, and at least one support in the middle:

Get some "L" brackets like these:
They usually come four to a package for around $3. Then just use a drill and use the brackets to put the "legs" on the bottom of the table. You're done! Mine is a little wobbly, but when you push the sofa up to it, it secures it perfectly.

I needed a little more height on my table, but didn't want to make the table taller, because you would see the unfinishedness of it (word? OK.) sticking up over the back of the sofa. Instead, I got a few more pieces of wood and made a little pedestal. I painted everything in chocolate brown:

You don't have to leave it exposed...for a long time, I had fabric over the table. You could even stain it. There are unfinished edges all over the place on mine, but no one would ever notice.

I'm not lyin' when I tell you these projects are easy. Have Lowe's or Home Depot make all your cuts and all you need is a drill and the brackets. The whole table will take you less than 30 minutes to make. Swear. For reals!

Friday, April 10, 2009

Transforming a Goodwill coffee table

Remember this find from a few days ago? A steal for $24.99 at Goodwill!

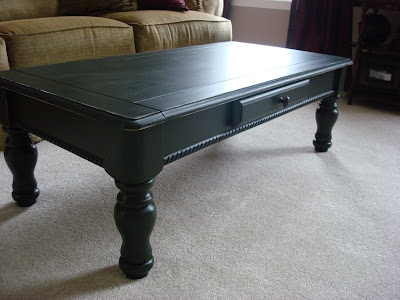
Here she is, in all her glory! I removed the knob and replaced it with an extra I had from our kitchen:
When I sanded it down I was beyond thrilled to find out it is REAL wood. Not laminate or veneer. Real knots in the wood and everything:I didn't poly the table, because being real wood, any scratches or nicks will add to the character. I love the dents all over the top: I distressed the edges. Distressing stresses me OUT. Seriously. Spending that much time painting and then messing it all up?? Wow, it really messes with me. But it is worth it:


I felt like I was doing a photo shoot, I was taking so many pictures...YEAH BABY! YEAAAHHHHH...
I almost painted it chocolate brown, but there was too much of that going on in the room. I decided to pick up on some of the accessories and go with the black:
It pulls in the black from the chest on the sofa table, the lamp, and the kitty. Oh. Wait, not the kitty.

Just a refresher on painting furniture:
You don't have to sand, but it never hurts.
Primer is mandatory. MANDATORY. Unless you are painting bare wood.
Letting the primer cure (dry) for the recommended time is key. I cannot stress that enough.
You can get your primer tinted to the color of your paint (great with black or red).
I use a foam roller to paint all my furniture (angled brush for the detailed areas).
Letting each coat of paint dry for the recommended time is also important.
Sometimes I use poly over furniture but most of the time I don't. Poly leaves roller marks that drive me nutty! (Any suggestions for that?)
Let the furniture cure for up to a couple weeks (sometimes more, sometimes less) before you put anything on it, like accessories.

Have a great weekend! (OH, and I'll tell you the New Kid's story soon. Just so you know...Joey was SUPER sweet!)

Thursday, April 9, 2009

I have...

been blogging for almost a year. ;)

I have parasailed.

I have been to the top of the Statue of Liberty, the London Eye, the Empire State Building and Rockefeller Center.

I have gone into labor five times.

I have been in labor for 24 hours.

I have given birth once. :)

I have been married in New York City.

I have snorkeled in Hawaii.

I have been to four New Kid's concerts.

I have sat front row once.

I have met four of the New Kid's in 1994. (And two were jerks, but I still love them.)

I have lived on my own.

I have auditioned for Wheel of Fortune.

I have been married to my husband for 4.5 years, but have known him for 17.

I have had a Pina Colada, on the beach, at 10 a.m.

I have kissed a girl. (Not gross-like, come on!)

I have sang karaoke ONCE.

I have eaten haggis in Scotland.

I have been a little bit pregnant.

I have been on the set of 13 Going on 30.

I have been on a bus trip across the country (both ways).

I have been fired. (From Chili's. In high school. Dang.)

I have been one thesis paper away from a Master's Degree for five years.

I have run a stop sign and hit a cop. (Oh yes. I have.)

I have experienced ESP.

I have driven ten hours straight.

I have been insubordinate.

I have stood five feet from a roaring train just to get my flattened penny.

I have picked the worst guy and the BEST.

I have eaten at Perkins once a week for the past six months.

I have painted a Goodwill coffee table! (And it looks gooood! I'll show you tomorrow!)

What have you done??

Tuesday, April 7, 2009

I will spray paint ANYTHING.

Soooo...I still have a cell phone held together by tape...but...

I got my new bamboo shades for the family room! Whooty. Hoo. I love them. I shopped everywhere and ended up just getting them at Target for $35 each. Unfortunately/fortunately we have very tall windows, so I had to pay more for the 72 inchers:

I am SO over our blinds. UGH. We have the bamboo shades in a couple other rooms as well and I just love them, and I think slowly but surely I will replace all the blinds. This time I invested in the privacy liners for the back of them as well.

I wanted them in our bedroom so bad but didn't want to spend another $70...so I borrowed them from another room. They weren't the right color though. I tried (so hard!) to just live with them but just couldn't.

I got the great? crazy? idea to spray paint them -- and two cans of chocolate brown spray paint later:

Oh my. Loverly. Exactly what I wanted. It was crazy easy. I didn't even paint the other side, since I used the privacy liners again. Here's the honey color they were before with the new chocolate brown comparison:

So easy! So cheap! And they make the room super dark too. I loooove our room dark as long as possible in the morning.

So to answer your burning question about the hardwood/laminate in the last post...I told you it's hard to tell anymore! The FIRST picture (of the two) is the real thing!! (And cost a LOT more than the other one...) See...hard to tell, eh?

P.S. Our floors (in the very first pic) are Pergo, color is Santos Cherry, from Home Depot. Heart them.

Monday, April 6, 2009

The Great Debate: Laminate or hard wood?

We used to have carpet in the family room. Then this sweet little thang came into our lives:See her? Pee cat. We "rescued" her and she came to us hairless, a little beat up, with a tendency to PEE. There was a particular spot in the family room she visited a few times. When our son was born I told hubby I was DONE. We looked into getting hard floors installed.

I looked at hardwood and laminate. Touched the hardwoods lovingly...all the while looking at the price tag, thinking about friends who had real wood floors...imagining the dents, dings and scratches...

And how I would seriously CRY with each one of them at that price.

I couldn't do it. I couldn't spend that much money knowing they would get banged up. And knowing I would CRY. So we went with the laminate and luuuuurve it! (See above.) It's been two years and they have held up incredibly well. Shockingly well.

If I had a million dollars, or even an extra couple grand, I'd probably go for the real thing. But now they make laminate so real looking -- you'll be fooled. At the design firm I work for, the owner had to use both laminate and real wood floors -- can you tell the difference?:
Ohhhh, pretty lamp! Sorry...here you go: Can you tell which is which? What do you think -- do you have real or "faux?" If you want it to install hard floors -- which one do you plan on installing? Or do you even care?

OH!! Check out the coffee table I got for $25 at Goodwill today!:
I was looking for something to do this with. But I'm trying not to spend money...(I'm so going to tell hubby I found it on the side of the road). And the foam, fabric, etc. is not in the budget right now. At the very least, it's getting a black paint job.

It's a little country looking but I love the detail on the sides:
I'm off to sand this baby! Whoo hoo!

Friday, April 3, 2009

Easy drapery tricks

I've learned a few drapery tricks in the "biz" that I thought I would share with you. The "biz" is veeeeery slow right now, by the way. I mean WAY. SLOW. Darn it -- more time to blog!! Drats.

So here we go! If you love the look of the look of pleated drapes -- something like this:
You can "train" your drapes to do the same thing! Now this depends on the fabric, and it helps if they are lined and a little heavier, but it works on most. Just take a piece of fabric, a ribbon, etc. and loosely tie it around around the drapes, after you have the pleats the way you want them:
Make sure it's loose enough it doesn't leave a dent. It's best to leave them as long as possible -- a couple weeks even. When you take it off, the pleats should hold. (This is ruling out dogs/cats/two-year-olds messing with them of course.)

It even looks pretty cute, eh? (Hmmmm. Mental note...) I just redid these drapes for the toy room so I'll show you the final project next week.

Next is an oldie but goodie. Hang 'em high!! You may remember when I retreated the bathroom drapes here:
I've had these hanging at this height for five years. For some reason, they seem way too low to me lately. I wanted more light to shine in the bathroom, so I just raised them six inches:
ALWAYS hang your drapes higher than the window. Even in our rooms with soaring ceilings, I hang them at least four inches from the top of the window. This is especially helpful in rooms with eight foot ceilings -- it draws the eyes up and gives the illusion of taller windows and walls.

My final and favorite (oooh I love it!!) trick for you is one that will make your drapes look like custom, pleated drapes, even if they are not.

Instead of hanging your drapes from the clips and letting them hang down -- grab the fabric and pinch about two to four inches down from the top, and clip the fabric from the back:
Your drapes have to be long enough, obviously, for you to raise them up a few inches. In our bedroom, the drapes are super long, and I wanted a really luxurious look, so I clipped them about four inches from the top:
Same for the living room. I love that you can't even see the rings. (That I spent a lot of money on. Huh...)
In our family room, I didn't make the drapes quite as long because of the pee cat. She used to like to pee on drapes. ARGH!! I about kicked her. to. the. curb. She's cured now though, so I will be adding some length to these soon. For now, I only clipped them about an inch or so from the top:
The dining room drapes I just made too short. (Dang. Fist shaking in the air!) So I did the same here:
Here's another view from the back to show you how to do it:
After you get them clipped, poof them from the front to get them the way you want them. This trick also works best with thicker fabric, or drapes with lining. If you have silky drapes or lightweight drapes, it may not work. If you have the length, try this one out for sure. You will LOVE it!!

A few shout outs I need to take care of -- Shelley at The Shabby Belle featured me last month. Check out her adorable baby girl clothes she sells. Caaute!!

Heldy at To the Moon and Back found some of my office fabric. GOD BLESS YOU WOMAN!! Many of you offered to find it, thank you so much. I'm so happy to have two more yards of my fabric safe and sound.
I won my friend AnNicole's giveaway at Our Suburban Cottage -- check her out. Her house is FAB people!! I won these!:
I only had ONE birdy in our whole house till now. (Pick up your chins -- and I don't even have ONE nest!! I'm a loser, I know.) These birds are freakin' adorable -- already right at home on the kitchen windowsill. Thanks AnNicole!!

Have a great weekend!

Wednesday, April 1, 2009

The transformation of a room.

This post could also be titled:
How to work with 25-foot ceilings.
OR
How to work with a paint color on 25-foot ceilings that you now hate.
OR
How to work with a sofa you bought waaaay too fast you now can't stand.

OK, so let's move on. Remember when I showed you how to cut and install molding here? Well, this is what I was working on:
This wall goes up reeeeeally high, and when we moved in, I knew I had to do something economical to decorate it. I didn't want to spend one meeeeeellion dollars (thanks Jennifer!) on a massive art piece, so I ended up painting a huge rectangle on the wall and hung some vases in it.

We loved it at first and then the room was just blah. Big massive sofa that didn't work with the wall color. Big massive wall that didn't work with the sofa color:
So I got a bunch of brilliant ideas and spent just $3o to do a mini-transformation in the room. I added a little bit of molding to the rectangle and moved the vases around. I knew I needed something else to give the furniture more height. So I made a sofa table out of planks of wood. (It was incredibly easy, I'll show you how to do it soon!) It was just what the room needed:
I covered the "sofa table" in fabric and found accessories from the basement. Later I made new curtains and added the pillows, pulling in some more color. Pulled the ficus tree from the dining room for some more height:
Well, the ficus tree would practically devour anyone who sat near it. I have Christmas party pics of our friends shooing it out of their hair. It had to go. And all the sudden, EVERY TIME I saw those vases and flowers, I wanted to rip them off. the. wall. They were driving me mad.
So what's a girl to do on the cheap?? Add more molding!:
For just a few bucks, it created a whole new look in the room. I also removed the fabric covering the sofa table and just painted the wood instead. Again, I pulled from around the house and the basement to make the accessories work better: Before: After:
The wall color is still driving me nutzo and the sofa is OH-so-comfortable but a couch cover is calling my name. But we really, really love this room now.

This is something I cannot stress enough -- I think making a room you absolutely love can take a lot of time. This transformation has taken five years and I'm sure I'm not done yet. You have to live with it, see what works, what doesn't -- before you find the happy ending.